- Faris Delija
- April 2021
- Uncategorized
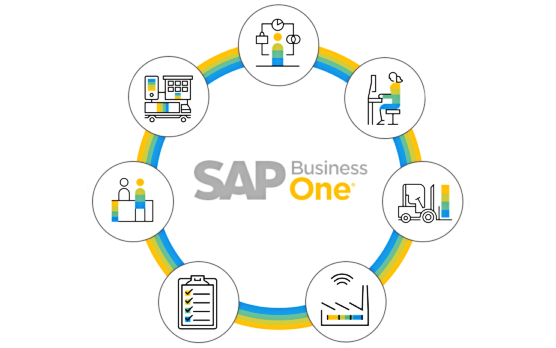
In this post, we describe one of the SAP Business One cornerstones: sales documents and the related accounts receivable. Below, you will find the overview of the SAP Business One sales A/R process. We will explain processing document groups and the inventory and accounting impact. You will also find a sales checklist at the end of the post.
The modern sales process can be quite complicated. It’s not just about exchanging something in cash with one customer at a time. Today, it is a complex collection of events. All of them are tightly connected and may involve production planning and inventory management routine. Besides, ordering, billing and dunning, and maintaining customer relationships are usually in the game too.
As for the SAP Business One sales process, it involves nurturing sales opportunities, creating sales quotations, managing sales orders, and invoicing buyers. In this post we will talk about:
- Converting a quotation into a sales order;
- Making sure that the order is delivered properly;
- Ensuring that a timely invoice is generated
Sales A/R Process in SAP Business One
It incorporates steps from issuing a sales quotation, selling the goods, delivering them, and invoicing the customer. Below, you can see a default process flow of a sales A/R process in SAP Business One:
- Sales Quotation;
- Sales Order;
- Delivery (may involve return);
- A/R Invoice (may lead to A/R credit memo);
- Incoming Payment.
Each of the steps is associated with a particular document (we describe all of them below). Since these documents are interconnected, SAP Business One lets you create them from each other, efficiently moving all relevant information from one document to another in the flow. Thus, you dramatically automate your document creation routine in SAP Business One.
SAP Business One sales documents defined
Another important aspect of copying from one document to another is that sales and A/R records carry much of the same information throughout the entire sales process in SAP Business One. Below, we define what is the same in each document:
- The term item in SAP Business One refers to goods and materials bought, produced, sold, and warehoused, or utilized for services you offer (a non-inventory item).
- Under the blanket agreement, we assume a commitment from your customer to purchase items or services you offer. Note that it should happen in a certain period of time. After posting sales documents along with an existing blanket agreement, SAP Business One keeps track of the agreement fulfillment.
- The sales quotation is associated with an offer that contains a price commitment for specific goods or services. You usually provide it to a customer or a lead.
- The sales order is another commitment from a customer/lead to purchase products or services. This time, product quantities and prices are agreed upon.
- The delivery record indicates the shipment of goods.
- The return document is about reversing the postings of a delivery. SAP Business One uses it when a customer sends goods back. At the same time, you can use return documents to correct errors made in the base document(s) before posting the A/R invoice.
- The A/R invoice is the only document mandatory in the sales process. SAP Business One considers it a request for payment. Besides, the system uses the document to record the revenue in the profit-and-loss statement.
- The A/R Invoice plus Payment is a variation of the document above used for cash sales to one-time customers.
- The A/R reserve invoice is an alternative solution. SAP Business One uses it to bill a customer before items are shipped. As for the inventory transaction, it takes place right after you copy the A/R reserve invoice to a delivery document.
- The A/R down payment invoice is a prepayment scenario document that records the amount to a predefined liability account and moves to the revenue accounts right after you apply the down payment to a standard A/R invoice. Note that A/R down payment invoices don’t affect inventory.
- The A/R credit memo is associated with the A/R invoice and reminiscent of the return document. It reverses the corresponding postings of the A/R invoice when a customer sends back goods for which the A/R invoice exists. At the same time, you can use it to correct errors made in the A/R invoice.
Common sales and A/R document structure in SAP Business One
Sales and A/R documents in SAP Business One share the same structure. They are divided into the following three parts:
- Header contains customer data and delivery dates. Its fields appear in every window of a sales document;

- Footer contains the calculated totals for the sale with discounts, freight costs, and tax. Its fields appear in every window of a sales document;

- Body. While header and footer fields are similar in all sales documents, the main difference occurs in the five body tabs:
- Contents – information about the ordered items or services;
- Logistics – information on where to deliver items, what shipping method to use, what billing address to refer to for sending the A/R invoice;
- Accounting – information regarding payment terms, methods, installments, customer’s control account, and the related automatic journal entry;
- Electronic Documents – information regarding eDoc generation and management.
- Attachments – links to different files attached to the document.
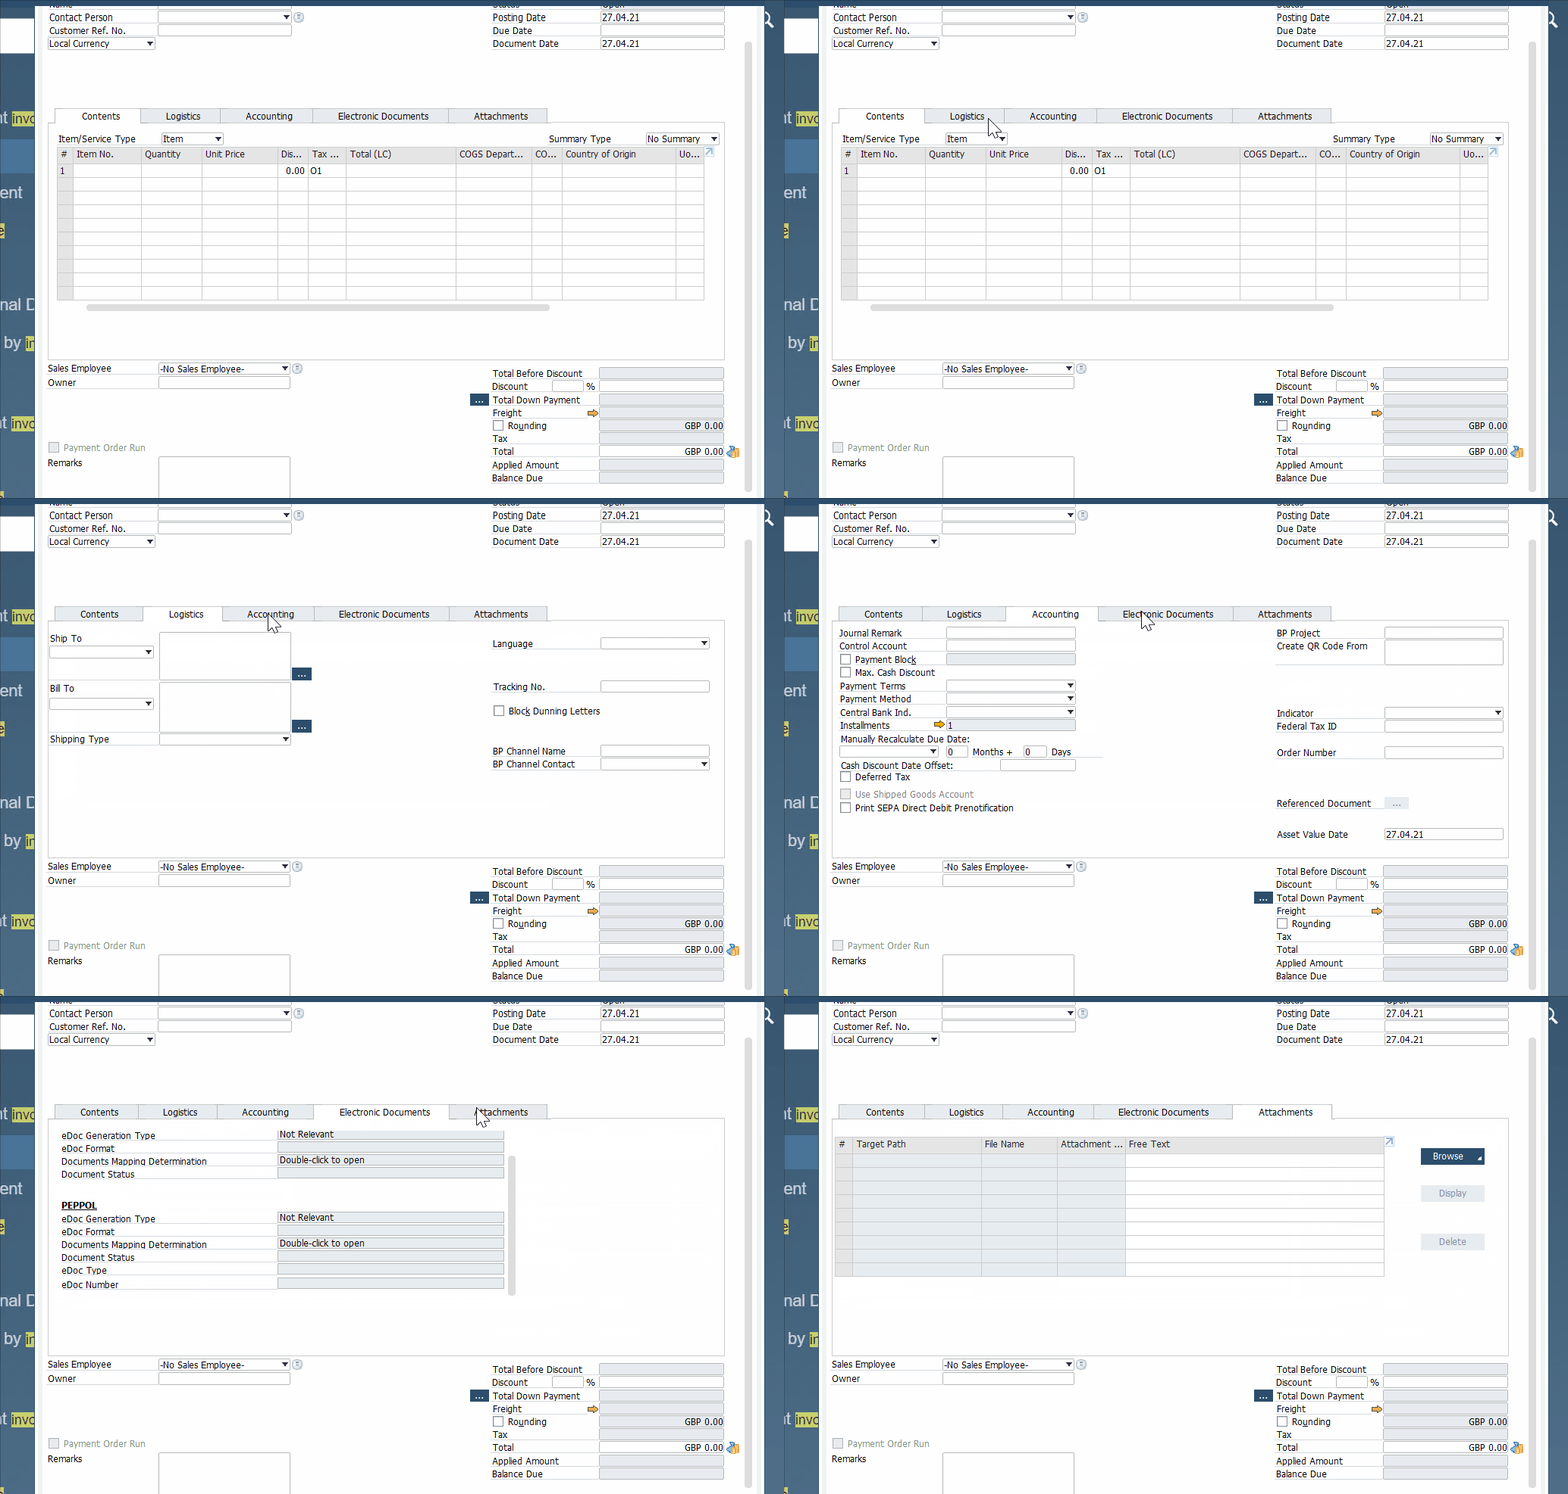
You should specify a folder for attachments. You can do that under Administration/System Initialization/General Settings/Path. Note that the folder should be situated on a server available to all users.

Key data in sales and A/R documents
In the following chapter, we discuss the key data of sales and A/R documents in SAP Business One. Since the ERP system lets you copy information between the records, it is vital to provide the key content from the very beginning. Otherwise, you will face problems later on. It is even recommended to ensure that everything is specified properly when the information is filled in for you. However, you need specific authorization to enter or update master data.
Customer Data
SAP Business One lets you describe people who buy your products and services via customer data. Therefore, creating a sales document should be based on relevant business partner master records. Pay special attention to the bill-to and ship-to addresses.
When on a new document window, you can locate the existing customer information:
- Find the Customer field in the document header.
- Click on the button to the right of the field. Alternatively, you can press the Tab key or the Choose from List icon.
- The List of Business Partners window displays.
- Select a business partner.
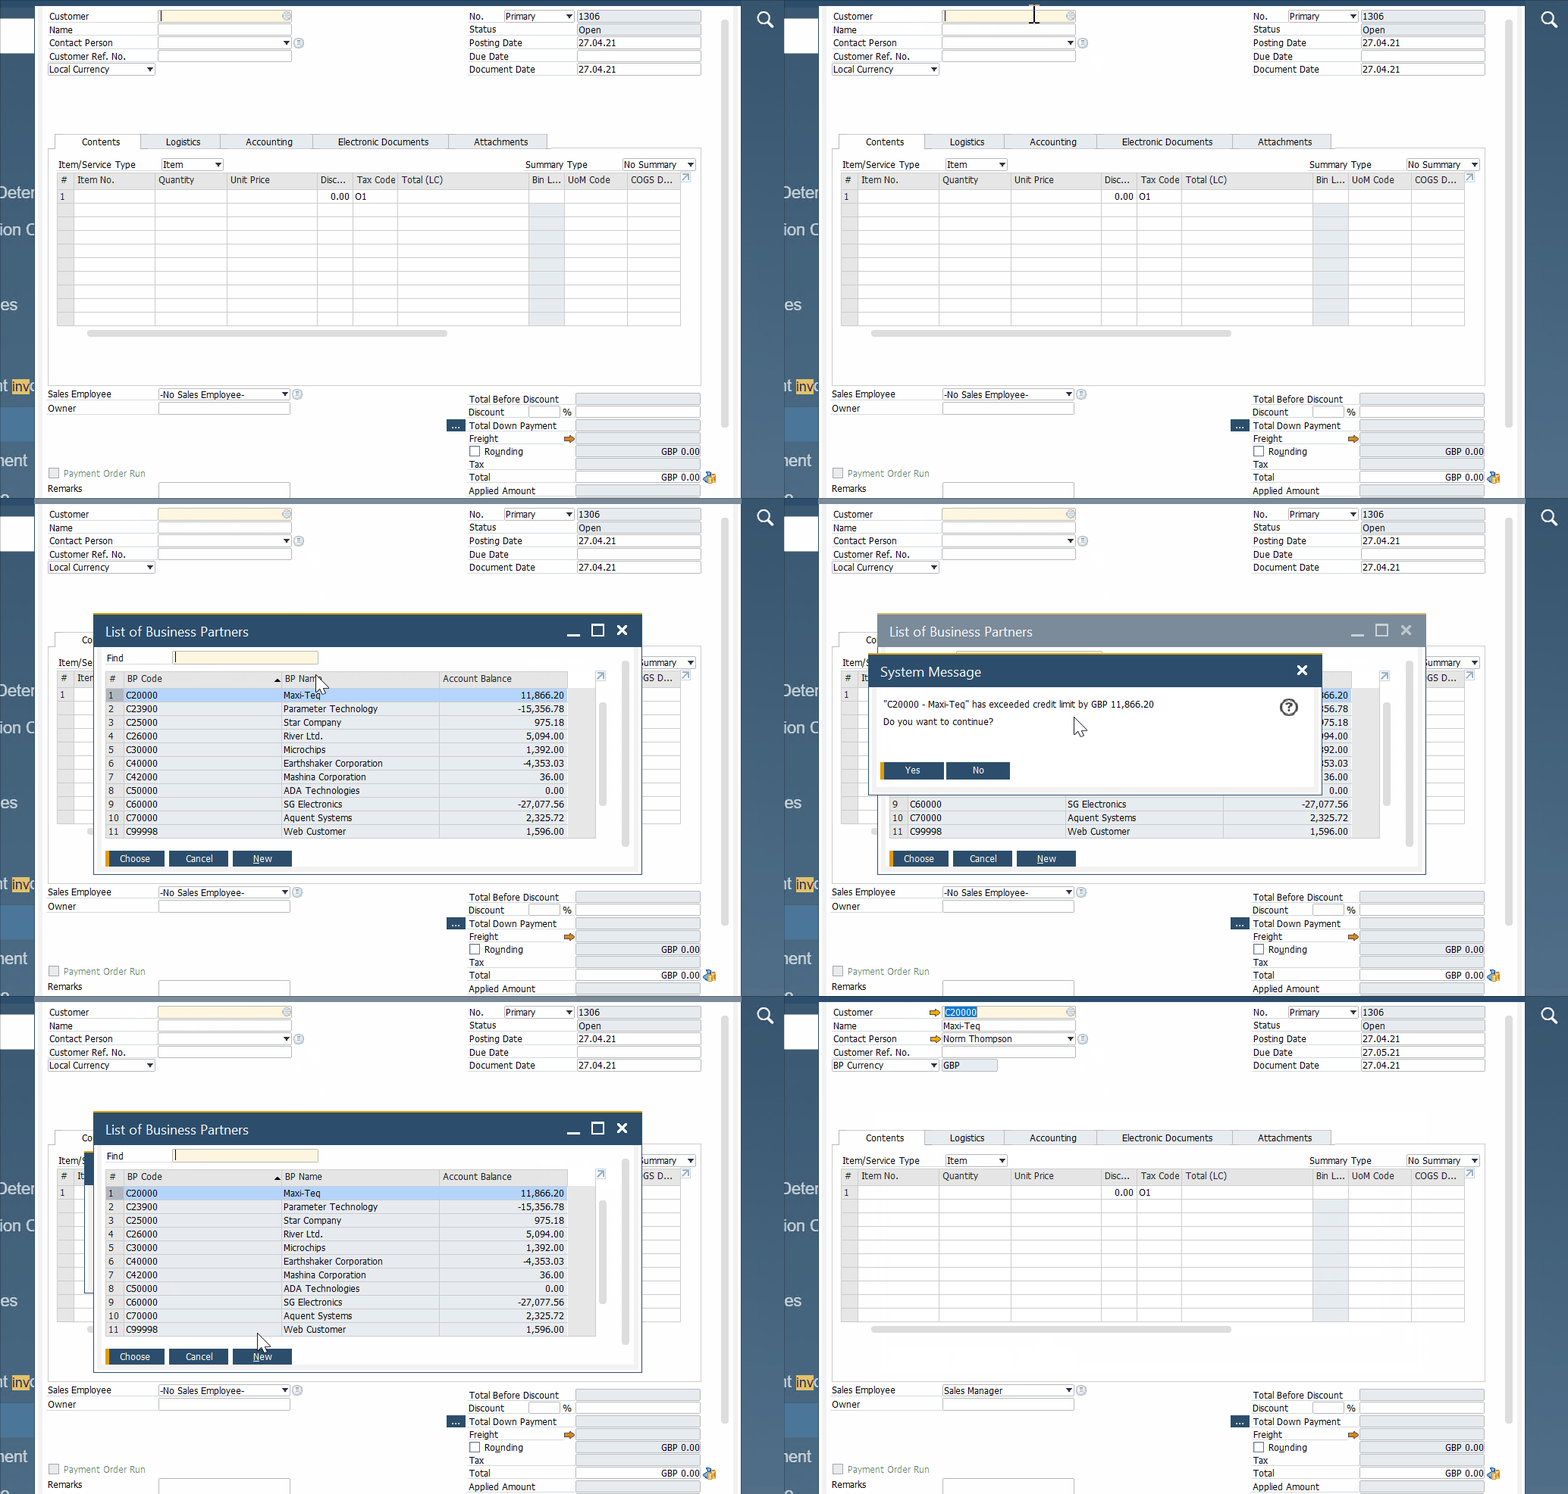
If you have proper user authorization, SAP Business One lets you add new customer information while creating a sales document. You can do that as follows:
- Press the New button on the bottom of the List of Business Partners window.
- The Business Partner Master Data window opens in the Add mode.
- Specify data about your new customer.
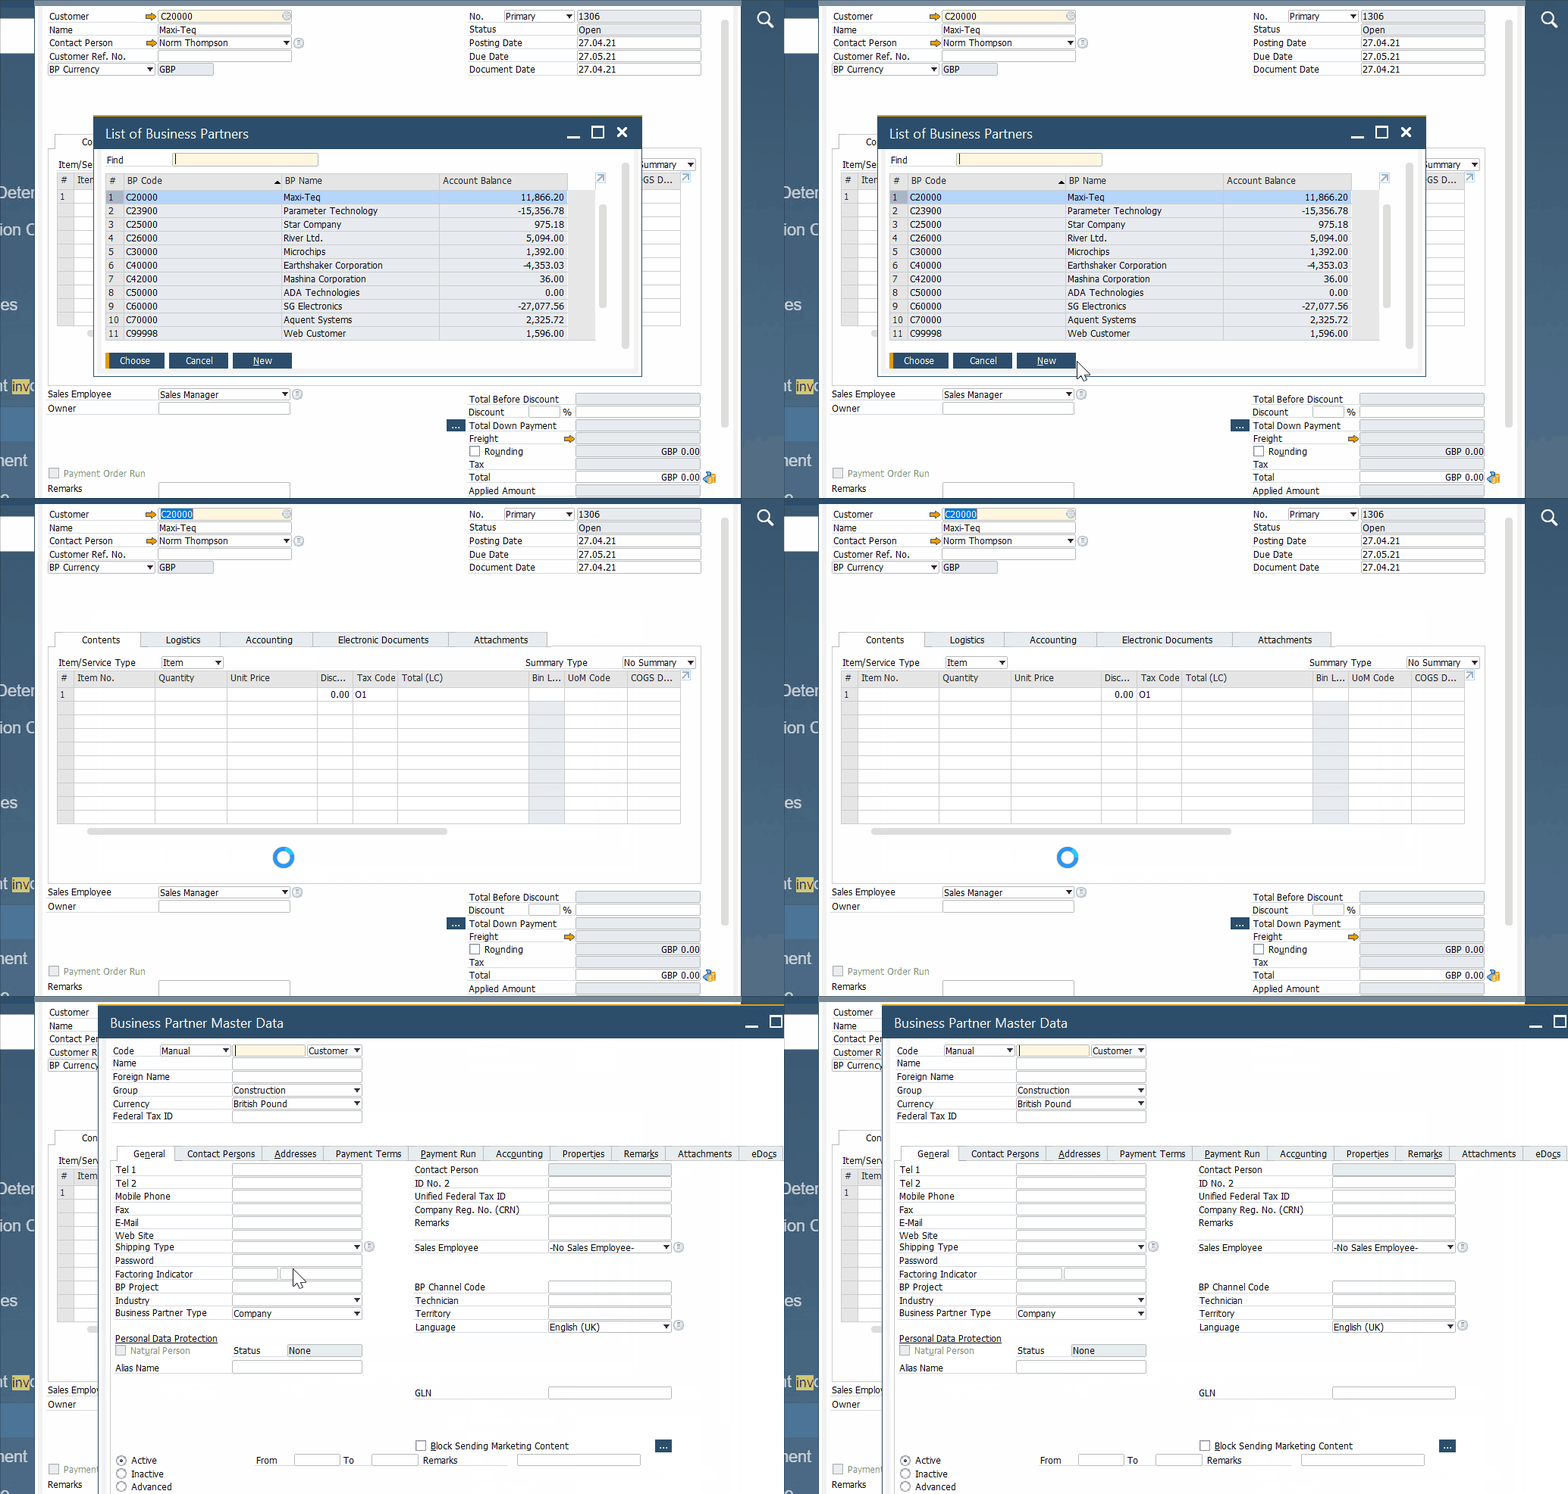
Note that it is possible to customize which fields appear in the Choose From List. Streamline the Form Settings when the Choose From List is open. Besides, you can specify how to optionally group the list of customers there. SAP Business One applies the changes to all fields with a Choose From List of business partners.
Item Data
SAP Business One lets you describe goods or services being sold via item master data. You can view a list of items as follows:
- Proceed to the Item No. field.
- Press the Tab key from there. Alternatively, it is possible to press the Choose from List icon in the Item No. field in the document’s Contents tab.
- Select an item from the list. To select multiple items, hold down the Ctrl key and click on as many items as you need.
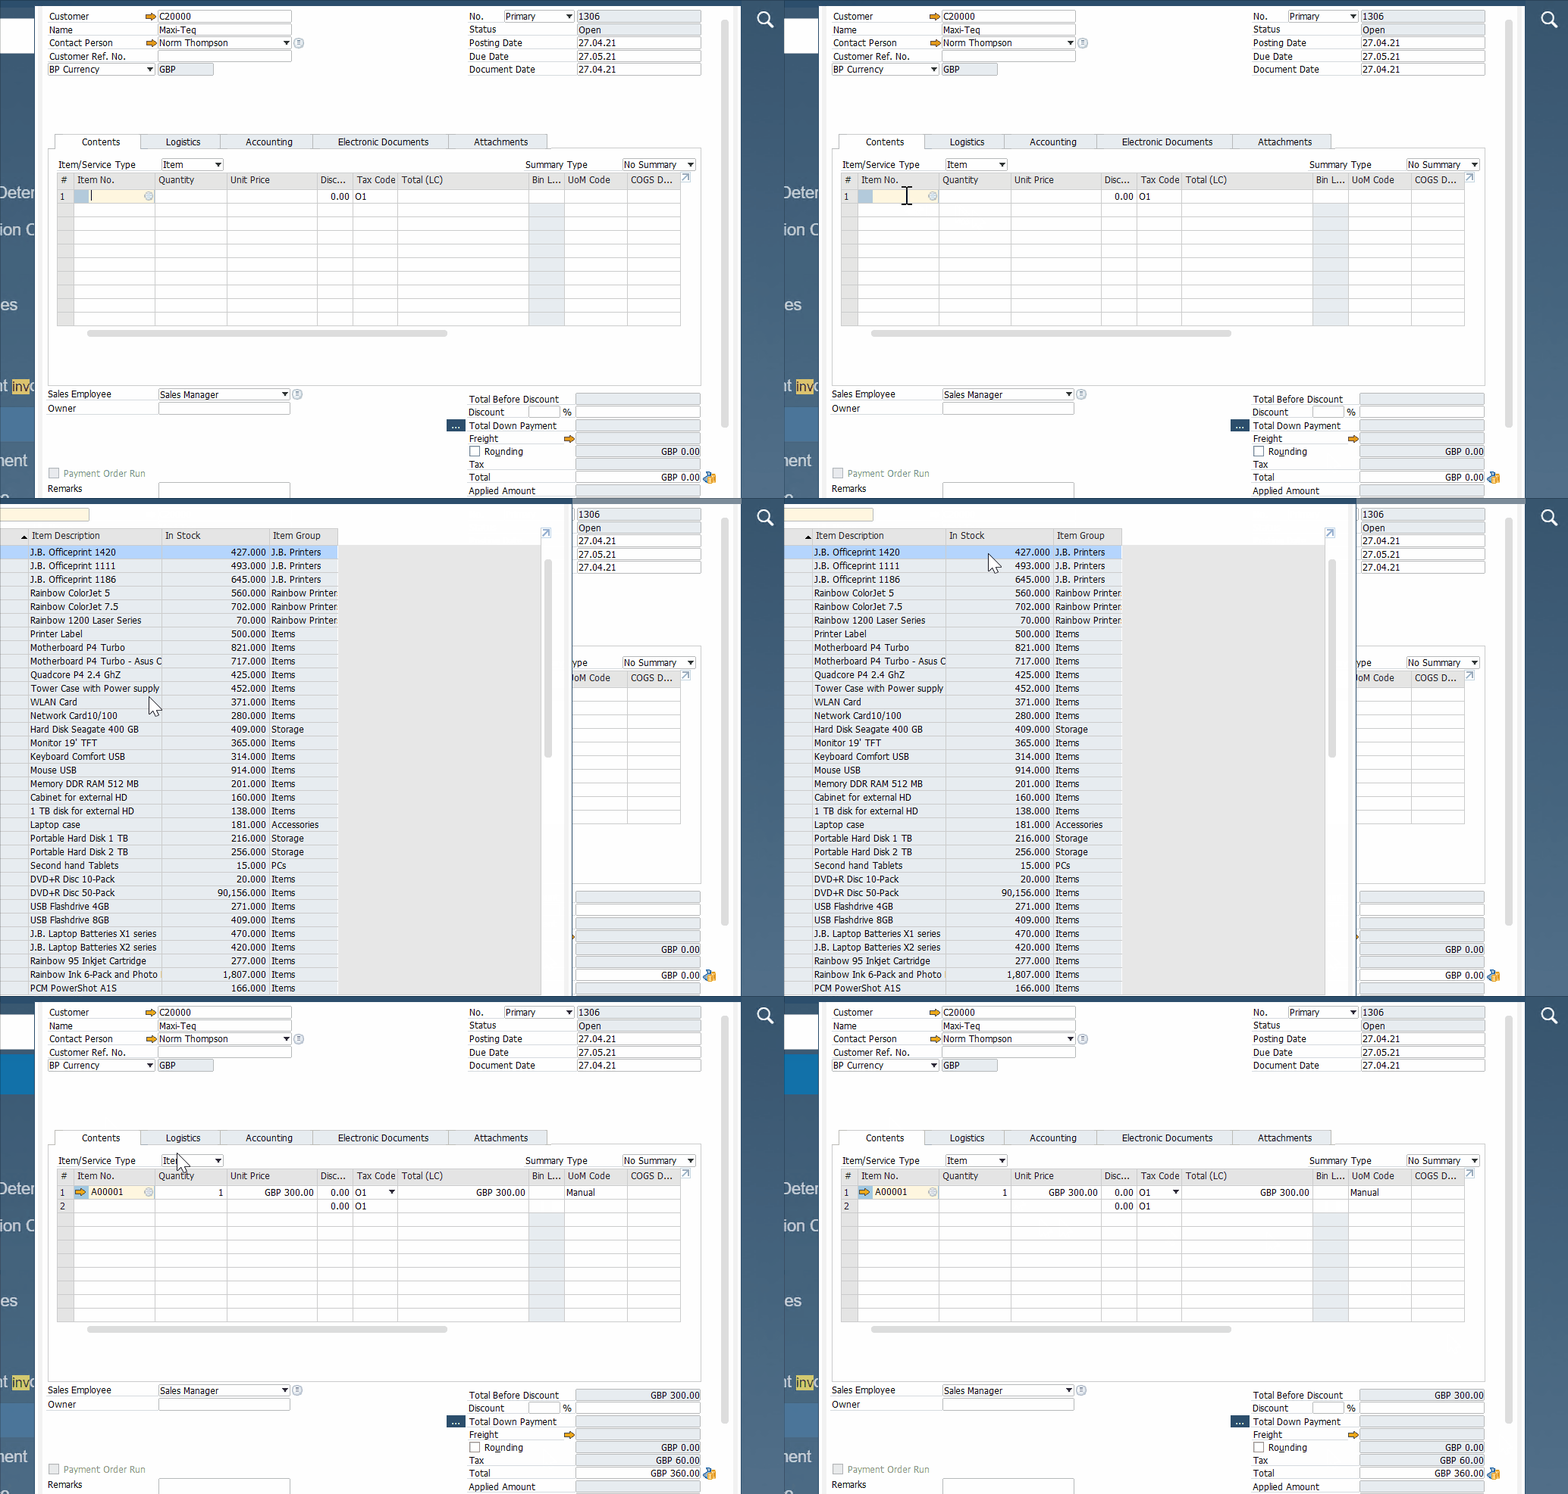
Alternatively, you can click the New button to enter an item. As you’ve probably guessed, the process is similar to selecting a customer. Therefore, you need special access to modify and add data.
Also, note that it is possible to update both customer and item information directly in the relevant fields in the sales document. Such changes do not affect the corresponding master data records. They are relevant to the specific sales document where you add them.
After changing a customer name or an item description in the sales document, press Ctrl + Tab. However, it is recommended to create new master data records to make permanent changes available for all users.
Now, let’s say a few more words about the form settings feature in SAP Business One. It lets you apply such changes as modifying the Contents tab by adding a new column. It is possible to insert subtotals for groups of items ordered or display special information. We describe how to make the appropriate changes in another article. When they are applied, all you need is to click on the drop-down list in the Type field and hit T for text or S for subtotal.
Key Calculations in Sales and Accounts Receivable Documents
Take a look at the toolbar. It provides icons for easy access to the following two calculations:
- Gross profit;
- Weight and volume of all of the items in a sales document.
Let’s describe each one in more detail.
Calculating gross profit in SAP B1
The gross profit calculation in SAP Business One lets you find out the impact of a sales document in terms of the bottom line immediately. You can perform it as follows:
- Go to the SAP Business One toolbar;
- Click on the Gross Profit icon;
![]()
That’s it! Alternatively, you can open the context menu to display the following Gross Profit window:
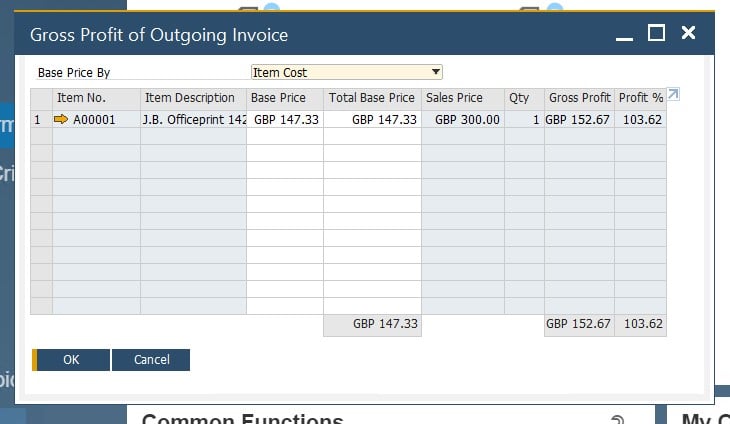
Let’s say a few more words about how SAP Business One calculates gross profit. The system subtracts the extended base price from the extended sales prices. It multiplies the sales price by the quantity to get the extended sales prices and the base price by the quantity to get the extended base price. The system lets you update base amounts after closing the sales document. There is zero impact on the accounting figures in this case.
Now, we’d like to draw your attention to the Profit % calculation in SAP Business One. The system relies on the settings under Administration/System Initialization/Document Settings/General tab to get the metric. It lets you choose one of the following ways:
- Gross profit percentage is calculated as the ratio of gross profit to sales price;
- Gross profit percentage is calculated as the ratio of gross profit to cost price.
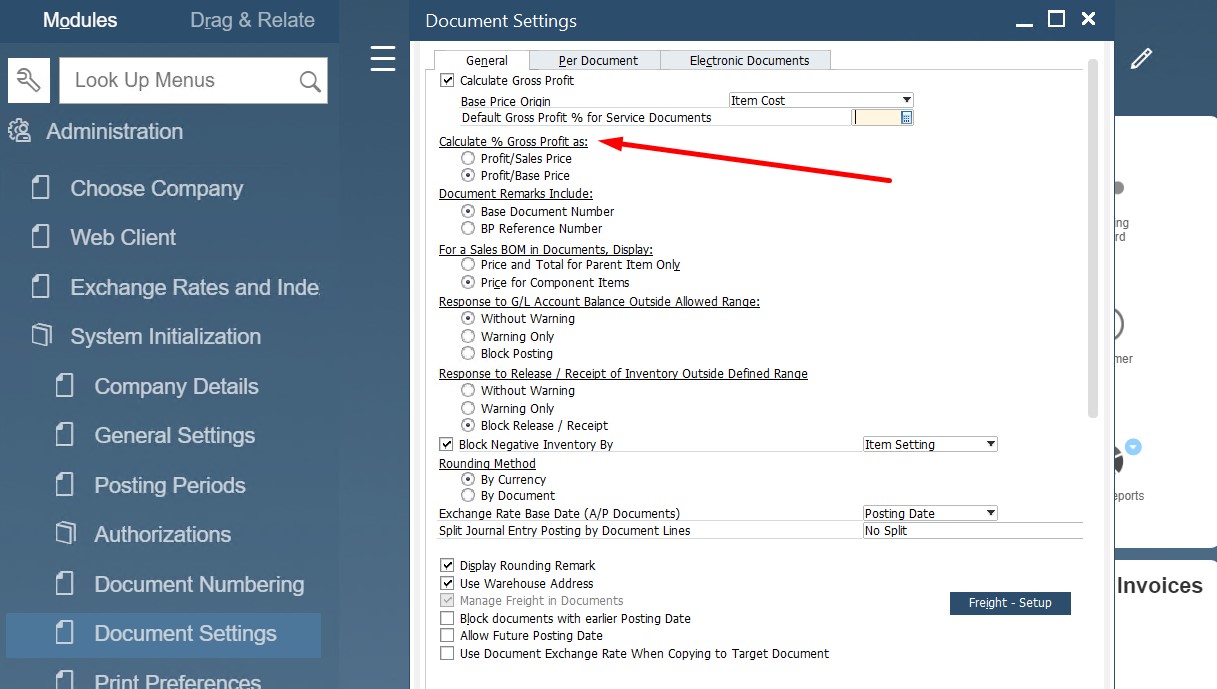
Also, visit the General tab of the Document Settings window. Here, you can set the default way the system calculates the base price, including the following parameters:
- The item cost;
- The specific price list;
- The recommended item price;
- The last purchase price, etc.
Gross profit for service documents is another important aspect of SAP Business One sales & A/R documents. The system doesn’t display item master data in service-type documents. Consequently, it is impossible to retrieve the base price automatically. To enable the gross profit calculation in these documents, go to Administration/System Initialization/Document Settings/General tab and define the default %.
Calculating volume and weight in SAP B1
It is also crucial to determine the order volume and weight. These metrics provide a direct impact on the logistics of sending and receiving orders. SAP Business One lets you calculate the volume and weight of all the items in a given sales document as follows:
- Go to the SAP Business One toolbar;
- Click on the Volume and Weight icon;

- Volume and weight information displays from master data per item. Note that it is totaled automatically.
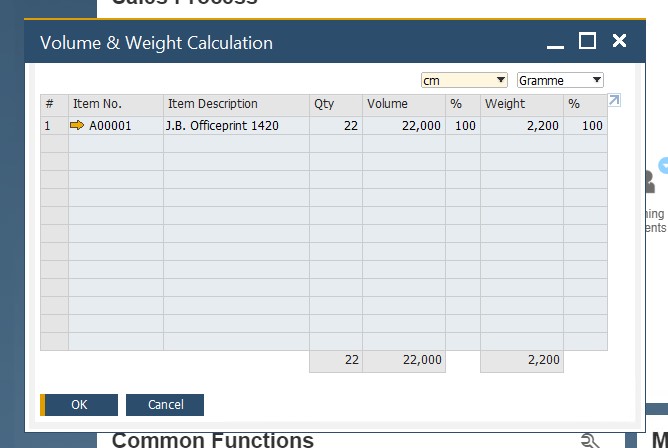
Pay attention to the fact that SAP Business One doesn’t calculate the total properly if some items do not have this information specified in the corresponding master data records.
Key Reminders: How to Add a New Activity to a Sales Document in SAP B1
SAP Business One allows for recording information about your contacts with customers and setting the corresponding reminders. You can easily make notes about a phone call and set up a reminder to follow up with the customer. Such activities can become a part of any sales document. You can do that as follows:
- Display the sales document as the active window.
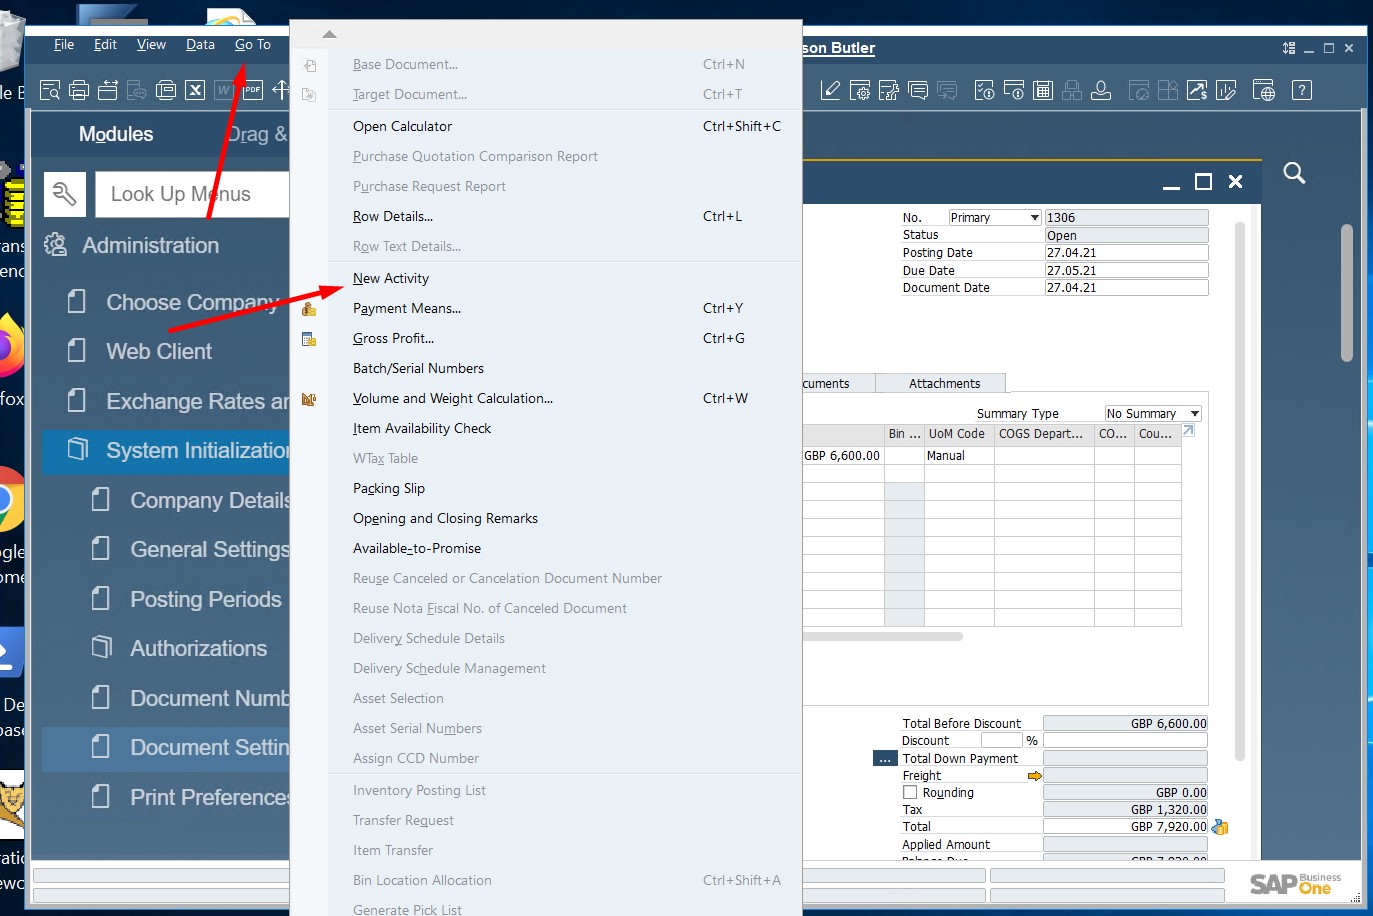
- Go to the menu bar and select Go to/New Activity. The system will display the Activity window. Alternatively, you can right-click to select the New Activity option.
- Select activity types and specify additional information about the activity in the Activity window. SAP Business One lets you create repetitive activities:
- Use the Recurrence option.
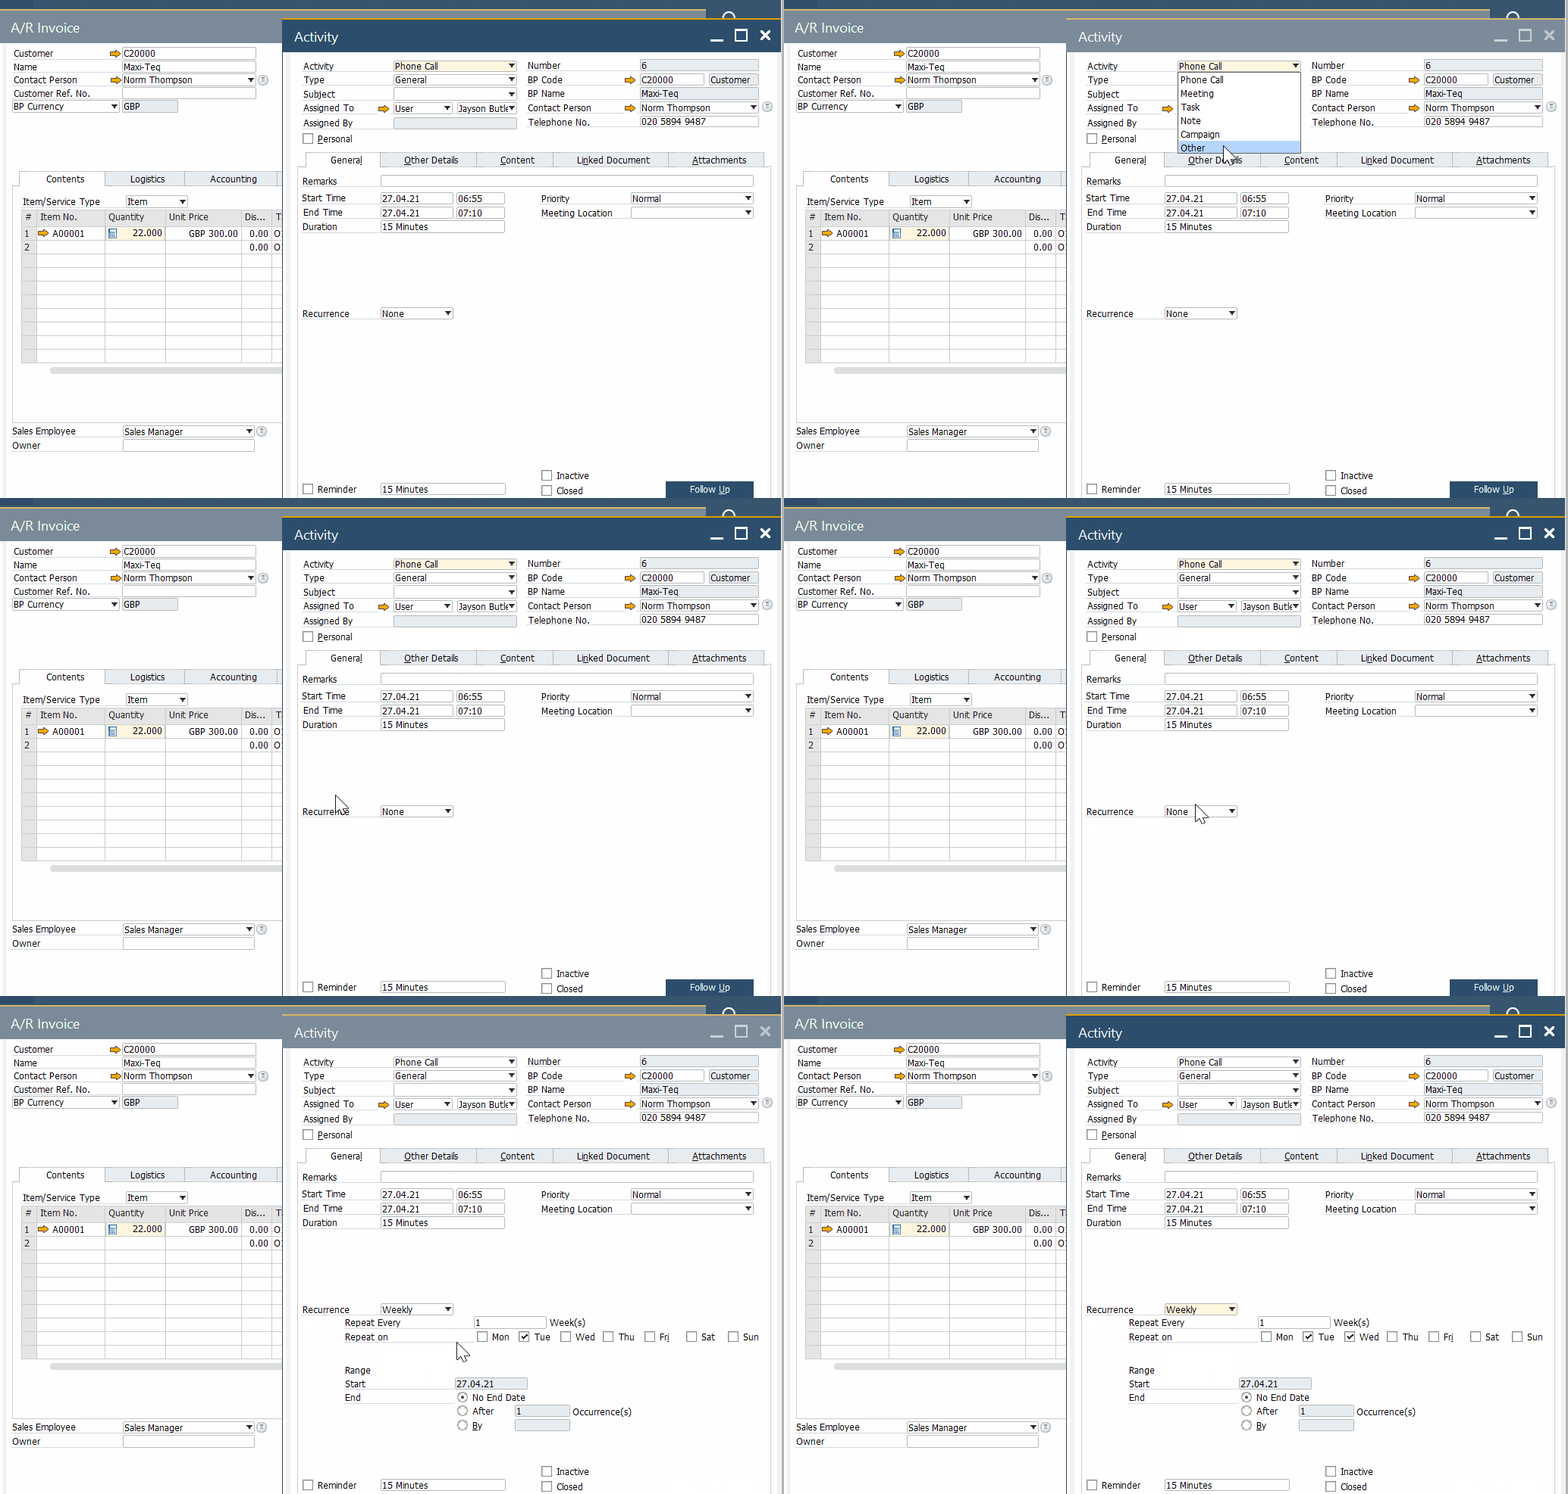
- Use the Recurrence option.
- Save your work.
Now, SAP Business One automatically links the new activity to the displayed sales document. Note that the same options are available for master data records and other documents.
SAP Business One Sales A/R Process Step by Step Guide
In the following chapter, we describe the sales A/R process in more detail. You will find each step explained, starting with the sales quotation.
Step 1: SAP Business One Sales Quotation
Customers often require an additional step before committing to ordering. They require a sales quotation that can be reviewed within their company. And SAP Business One lets you satisfy their demands. The system allows for creating sales quotations for both leads and customers.
You can create an SAP Business One sales quotation as follows:
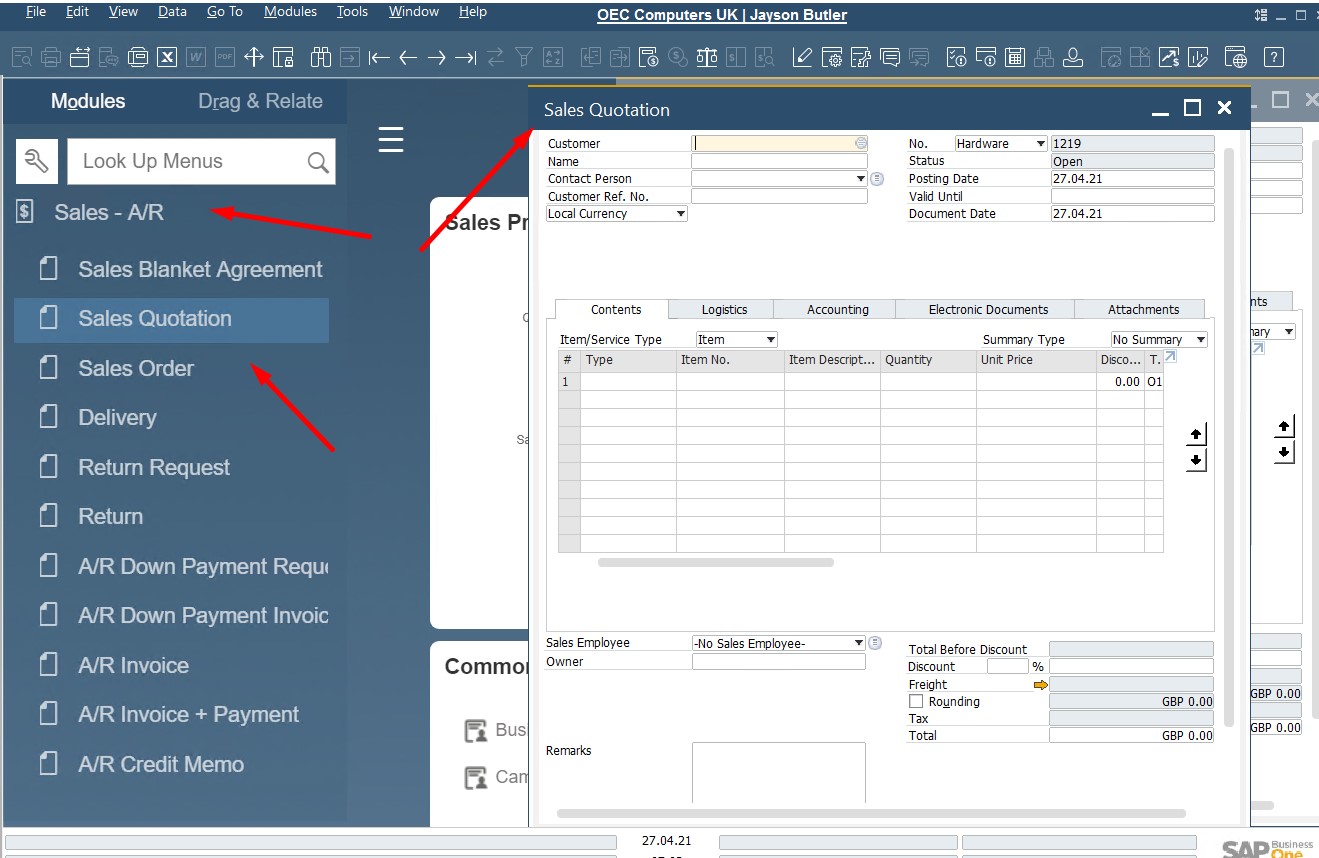
- Go to Main Menu / Sales – A/R / Sales Quotation;
- The system displays a blank sales quotation screen;
- Specify a customer or lead;
- Add the desired items;
- Continue editing the sales quotation details;
- Click Add when finished.
Although SAP Business One has just added the new sales quotation, you can modify it later if applicable. It is also possible to view the calculation of various metrics, such as gross profit or item’s weight and volume. The feature works as we’ve described in the previous article.
Now, let’s say a few words about price information management. The system defines prices for items in price lists, which are assigned to business partners, following this algorithm:
- You select an item and specify a customer;
- SAP Business One chooses a price list assigned to the customer;
- The assigned price list displays in the Form Settings window. You can select a new price list. As we’ve already mentioned, this action won’t affect the price list in the customer master data;
- Next, you can specify special discounts on top of the price lists.
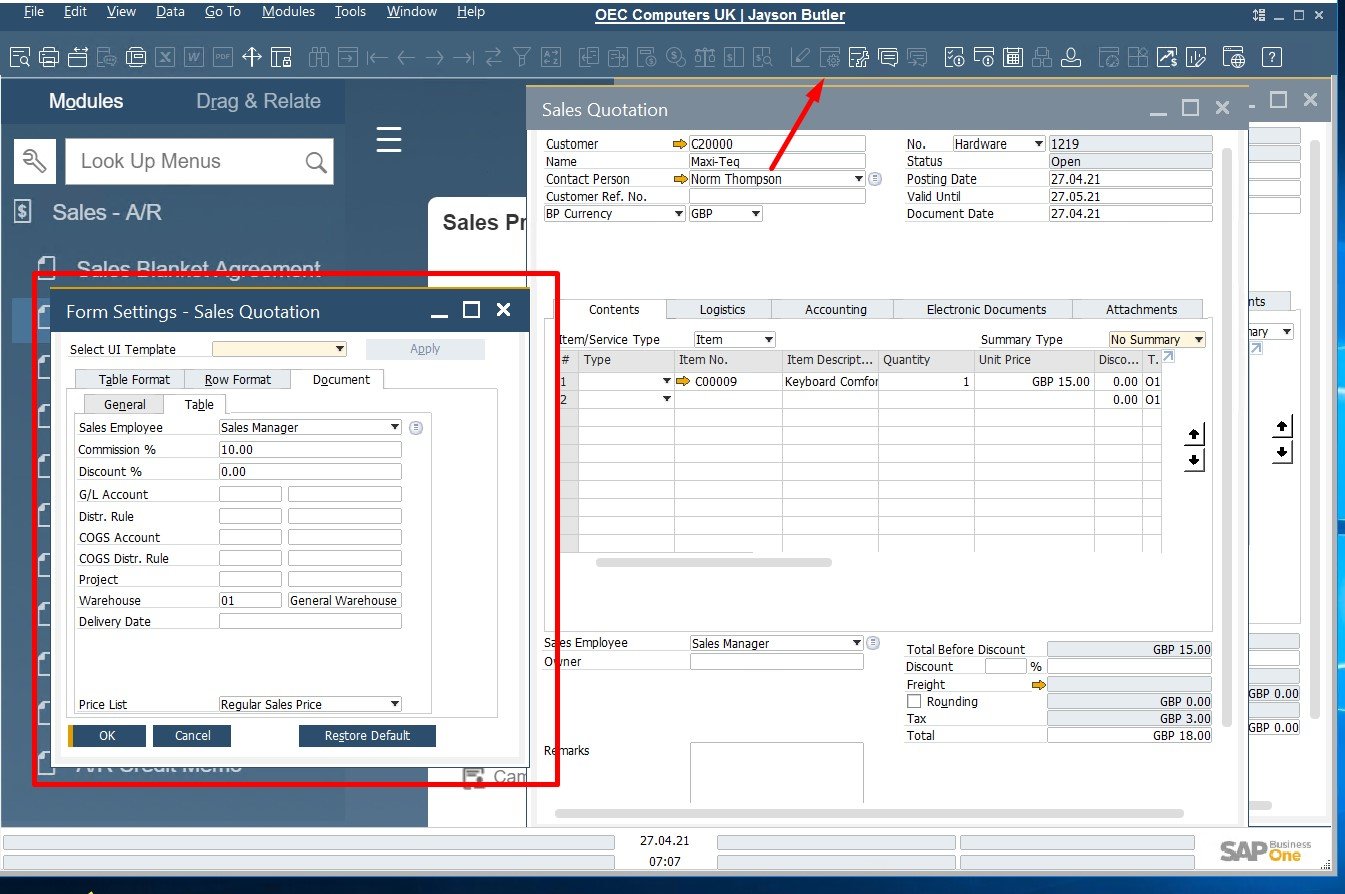
The alternative item row type is another sales quotation feature that we should mention here. It is a place in the document where you can specify items that potential buyers are interested in but don’t know whether they want to purchase them. Add an alternative item row type to provide information on additional items without affecting the total amount of the quotation.
SAP Business One lets you delete alternative items or include them as regular items when you create a sales order from the quotation.
Step 2: SAP Business One Sales Order
When you agree on a sales quotation, it’s time to proceed to another step – preparing the order. At this stage, another document is used – the sales order. It is vital for the following processes:
- Production planning;
- Warehouse items picking;
- Purchase order creation;
- Resource scheduling.
Due to the ability to create documents from one another, SAP Business One lets you create sales orders from order quotations and purchase orders directly. As a result, you eliminate data entry, streamline your working routine, and automate various daily tasks.
How to create and add a sales order in SAP Business One
There are two ways to create a sales order in SAP Business One. Firstly, you can generate a sales order from a sales quotation. At the same time, it is possible to create it from scratch. Use the Copy To button to turn a quotation into a new order.
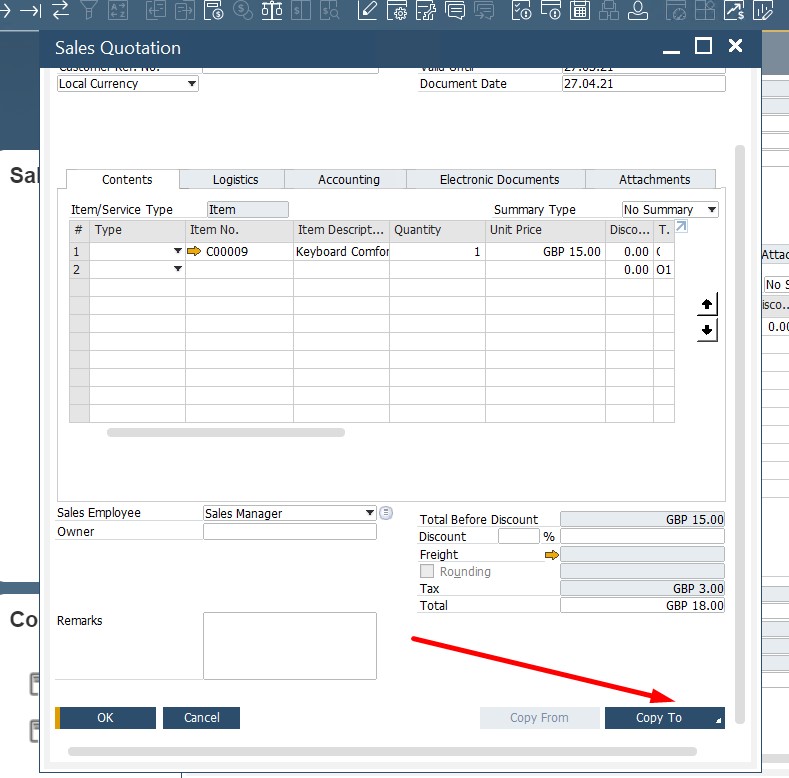
This approach provides a rapid way to create the next document in the SAP Business One sales process. The base document provides all the necessary information. Next, you apply changes to the target document. At this stage, SAP Business One lets you reduce quantities or adjust prices.
If you want to create a new sales order from scratch (no reference to a quotation is used), follow these steps:
- Go to Sales A/R -> Sales Order;
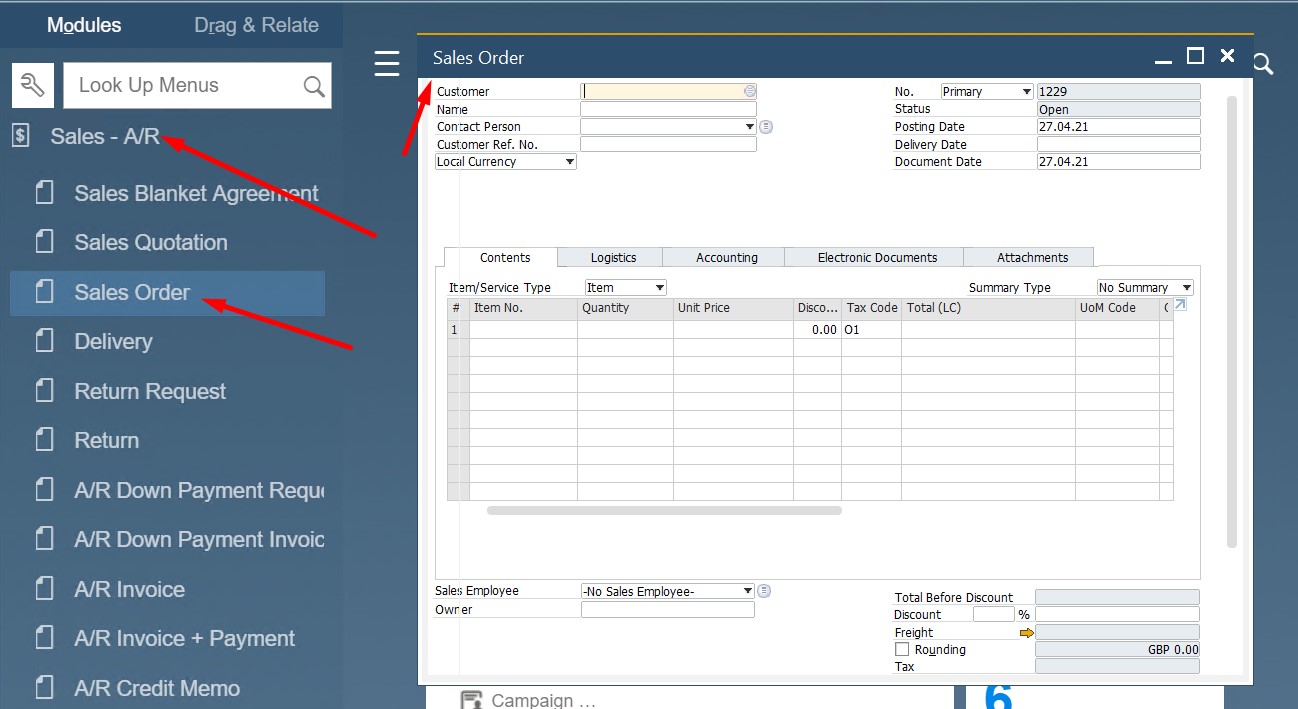
- The system lets you transfer information from master data.
- Fill in empty fields:
- Customer field;
- Items;
- Add the new sales order by clicking the Add button.
- Alternatively, you can save it as a draft: choose File/Save as Draft.
SAP Business One lets you change a sales order as follows. You can edit quantities, update prices, apply discounts, etc. However, these features are available after posting only if the corresponding functionality is activated. You can enable it under Administration/System Initialization/Document Settings/Per Document tab/Sales Orders.
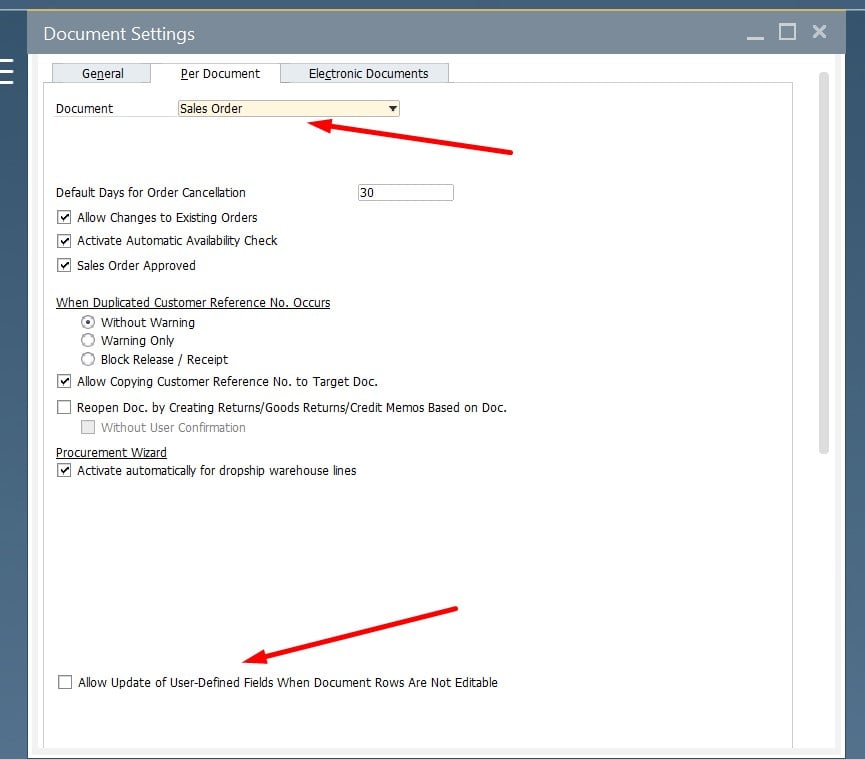
Also, note that it is possible to change orders that are open. What should you do if a sales process is stopped?
If you didn’t copy your sales order to a higher level A/R document (delivery or A/R invoice), SAP Business One allows for canceling it.
At the same time, you cannot do that when a sales order has been copied to a higher-level A/R document. In this situation, you can only close your sales order.
Besides, it is possible to cancel a particular row of a sales order in SAP Business One:
- Right-click the row;
- Choose the Close Row option.
Note that SAP Business One doesn’t delete a sales order when you cancel or close it. The document remains available for viewing and printing. However, the ability to change or copy it to a higher-level sales document is no longer available at this stage. Also, pay heed to the fact that canceled and closed documents are no longer available in the open items list.
SAP Business One lets you commit specific batch numbers to your customers in a sales order associated with items managed by batch numbers. You can do that as follows:
- Right-click the quantity field;
- Choose the Batch Numbers option.
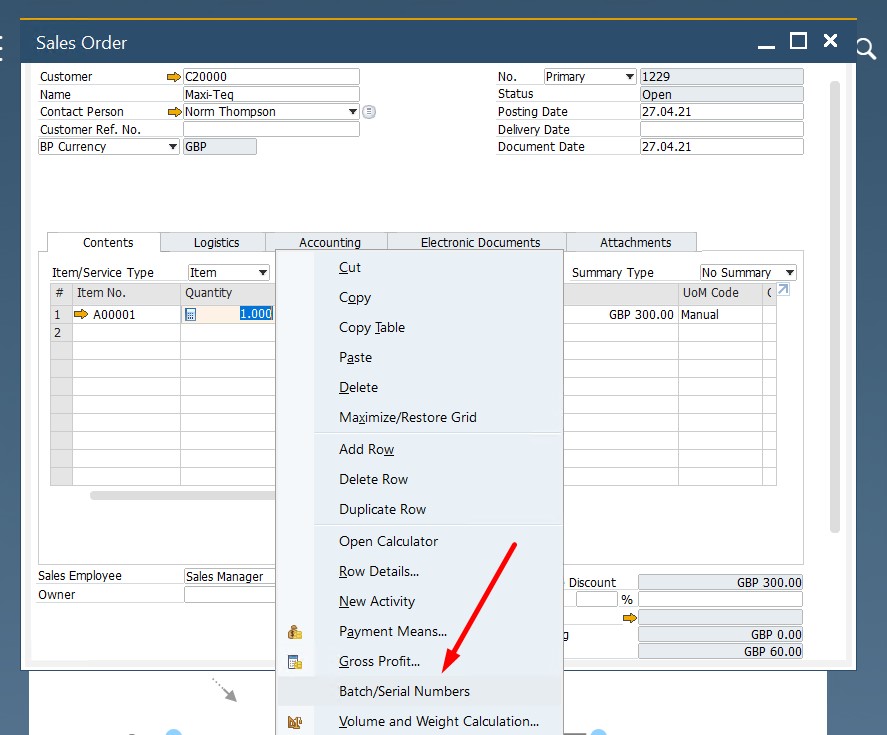
Note that the selected batches are allocated to the particular sales order. You cannot provide them to another sales document. However, the system requires you to reconfirm this batch selection. This step should be taken when you deliver the item via one of the following documents: a delivery or an A/R Invoice.
How to check item availability in SAP Business One
In SAP Business One and other systems, a sales order has the same purpose: it represents a commitment to deliver items in full at a certain date. Therefore, you should always check that it is possible to fulfill this commitment. The ERP system offers the Item Availability Check functionality for this case. You can leverage the feature as follows:
- Proceed to Administration/System Initialization/Document Settings/Per Document tab/Sales Orders;
- Enable Activate Automatic Availability Check.
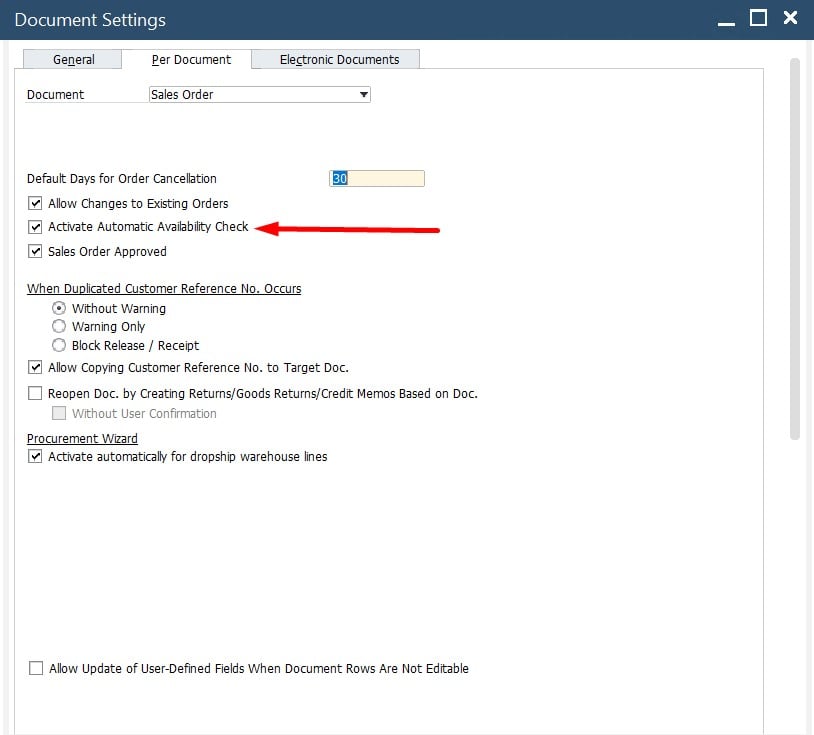
After that, the system will inform you when the available quantity for an item falls below the amount required. You will see a new window that provides the following options:
- Continue. This option lets you ignore the alert. Consequently, you keep the amount of the items as entered;
- Change to Available Quantity. Choose it to switch to the quantity that is currently available;
- Change to Earliest Available. This option lets you achieve extra flexibility due to the quantity available in the future. The row delivers date changes based on the earliest date that the required quantity is available;
- Display Available to Promise Report. This option displays the report that shows cumulative quantity by date. You can use the information from the report to change the delivery date for that item.
- Display Quantities in Other Warehouses. It lets you open the Items by Warehouse report to see whether the required quantity is available in another warehouse.
- Display Alternative Items. This one lets you choose a different item that is available. However, it is necessary to predefine alternative items for the current item to enable this feature.
- Delete Row. With the help of this option, you eliminate the current row.
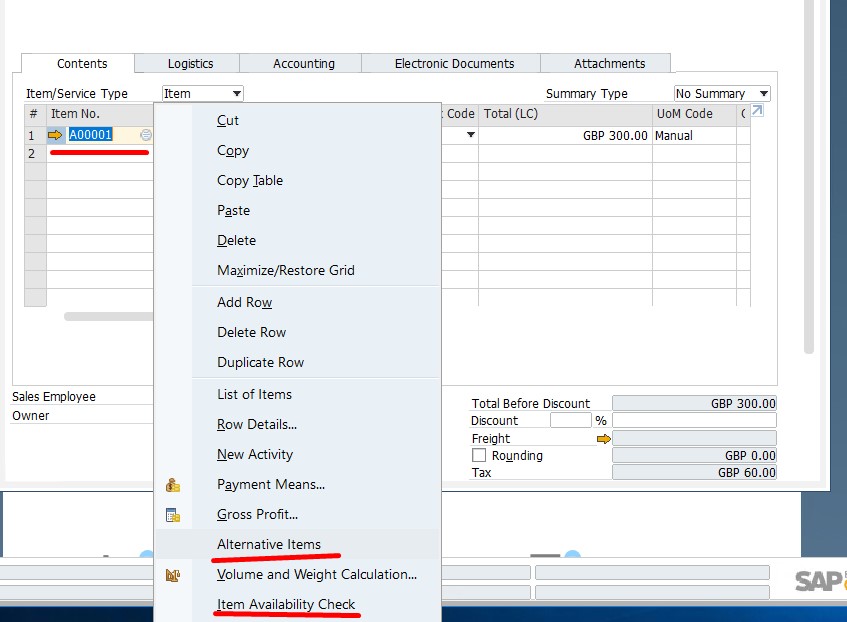
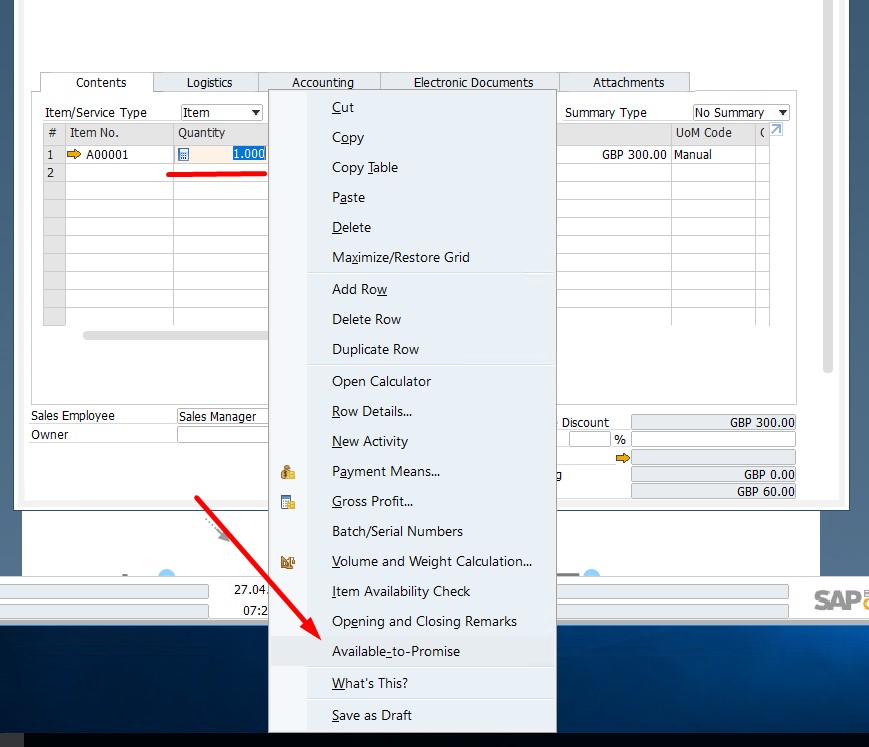
Although the automatic availability check is a powerful and useful feature, you may need to open some of its options manually. You can do that as follows:
- Firstly, it is possible to right-click the item code. This action opens the possible alternative items.
- Secondly, you can right-click the quantity. It opens the “Available-to-Promise” report.
- Thirdly, right-clicking the warehouse code displays the items by warehouse report.
For placing a backorder in SAP Business One, you just need to create a regular order. Next, the system lets you trace backorders and their status. Leverage the backorder report situated under sales reports. It displays open rows from the sales order along with the ordered quantity, delivered quantity, and backorder quantity.
How to run advanced available to promise check and delivery scheduling in SAP Business One
There is an even more advanced availability check in SAP Business One. The platform’s version for SAP HANA offers the Available to Promise (ATP) functionality. You can enable it here: Administration/System Initialization/Document Settings/General tab.
Besides, there is the corresponding icon on the toolbar that opens the ATP check. Click it to activate a graphical view that shows an item’s availability. The system lets you scroll right and left on a timeline monitoring when the item is available.

Next, when you place an order, SAP checks whether there is enough quantity to deliver on the required date. If you lack the necessary amount of items, the system displays the Delivery Schedule Details window. The latter contains recommendations for quantity and delivery dates.
For instance, a customer orders two laptops, but only one can be delivered on time. Another one is available for delivery on a later date. The following delivery strategies are at your service:
- Delivery Proposal. This option lets you split the delivery in two to match the available quantity.
- One-Time Delivery. This option lets you send only the item that can be delivered on time.
- Complete Delivery. This option lets you postpone the delivery and send the entire quantity in full.
For the third option, you can use the Delivery Schedule Management tool. With its help, SAP Business One enables order rescheduling. It is possible to leverage the Delivery Schedule Management tool to view all open orders in the search for the item with the ability to reschedule one sales order. As a result, you can fulfill the more important order, using the item quantities from less important orders.
Follow these steps to open the Delivery Schedule Management tool:
- Right-click on a row to view a list of all open orders for the particular item.
- Alternatively, you can choose the Delivery Schedule Management icon on the toolbar.
- Then, select the item.
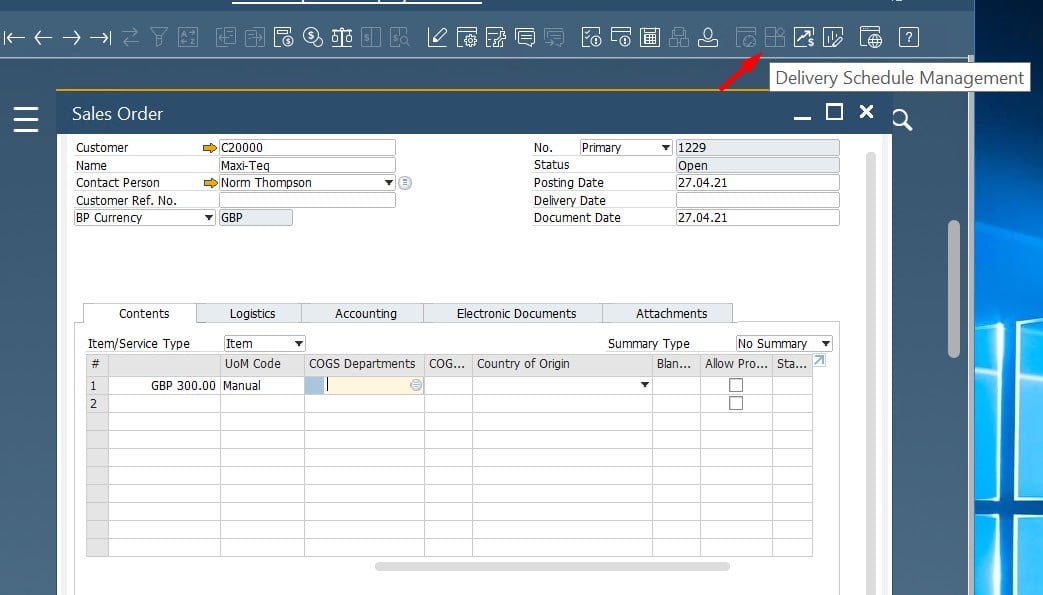
- Then, select the item.
- Expand the quantity to view what items cannot be delivered on time.
- Reduce the quantity of the previous order.
- Confirm your intent to move items from one order to another.
That’s it! Now, you are familiar with rescheduling less important orders so that the sales order with the higher priority is fully delivered on time.
How to enable drop shipment in SAP Business One
SAP Business One lets you handle a sales process where you don’t need a warehouse and your company serves as the intermediary platform between customers and vendors. People order from you while you order from vendors who deliver orders directly to your customer. For this case, SAP B1 offers the Drop Ship warehouse functionality. Thus, you can switch one of your warehouses to drop shipment, applying it to the sales order when necessary. What happens next?
Every time you place an order, the ERP system recommends creating a purchase order. The confirmation screen lets you choose items and specify such information as the vendor and the prices. You accept the proposed data and the system creates a purchase order along with the sales order. Pay heed to the fact that the ship-to address in the PO is the customer’s ship-to address from the SO.
However, using a drop-ship warehouse leads to no inventory transaction posting or the committed quantity increased. Consequently, the delivery of items associated with drop shipment doesn’t affect the inventory level. At the same time, no journal entries are posted to reflect inventory value changes. Due to these features, the dropship warehouse is excluded from the different inventory reports.
You can set up a drop-ship warehouse in SAP Business One as follows:
- Go to Administration/Setup/Inventory/Warehouses;
- Enable the Drop Ship option by selecting the checkbox.
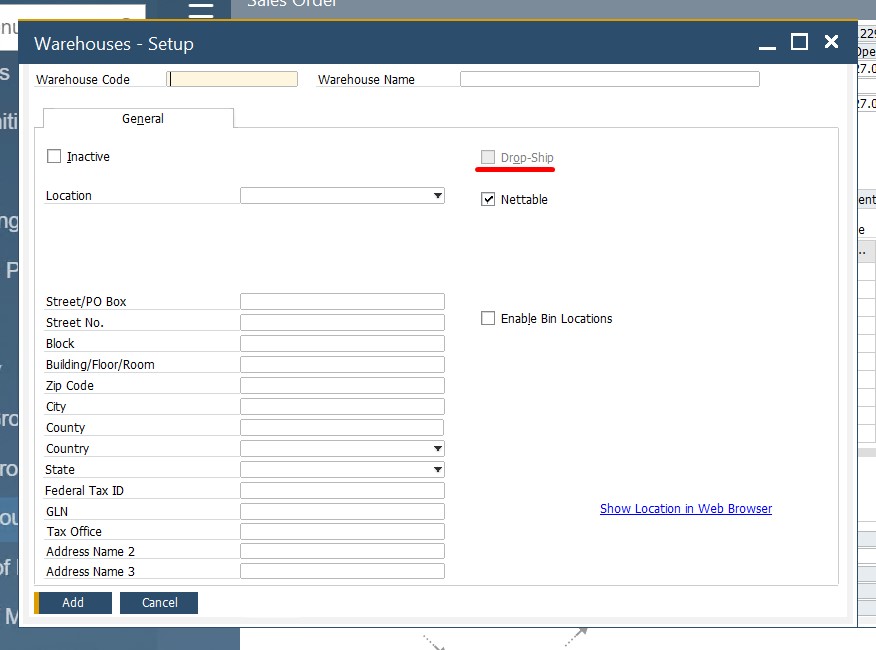
Also, you can automate the purchase order creation. The process is similar to the drop-ship functionality: check the Procurement Document box on the Logistics tab of the sales order. As a result, you enable the Procurement Confirmation Wizard. The latter participates in creating a purchase order or a production order. There are two conditions for using this feature:
- You do not keep your inventory items in your warehouse.
- You want to purchase on an order-by-order basis, reflecting the inventory movement in your general ledger.
Another optimization associated with the Procurement Confirmation Wizard is that it lets you create POs in bulk on the basis of sales orders in bulk. We focus on this functionality in another article.
How does a sales order impact accounting and inventory
As you’ve probably guessed, a sales order affects the stock level: the stock available for sale is reduced by the order quantity. However, no value-based changes are posted to the G/L. SAP Business One adds the items to the committed quantity in the inventory module. Consequently, the committed quantity is decreased every time the corresponding order is canceled or closed. Besides, the system displays the ordered quantities in various reports, providing information vital for optimizing sales processes and stock management.
Step 3: SAP Business One Delivery
A delivery document in SAP Business One indicates that goods have been shipped. It is also sometimes referred to as a packing slip. Below, we explore this step in more detail.
How to create and post a delivery in SAP Business One
You can create a delivery in SAP Business One as follows:
- Go to Sales – A/R;
- Choose Delivery;
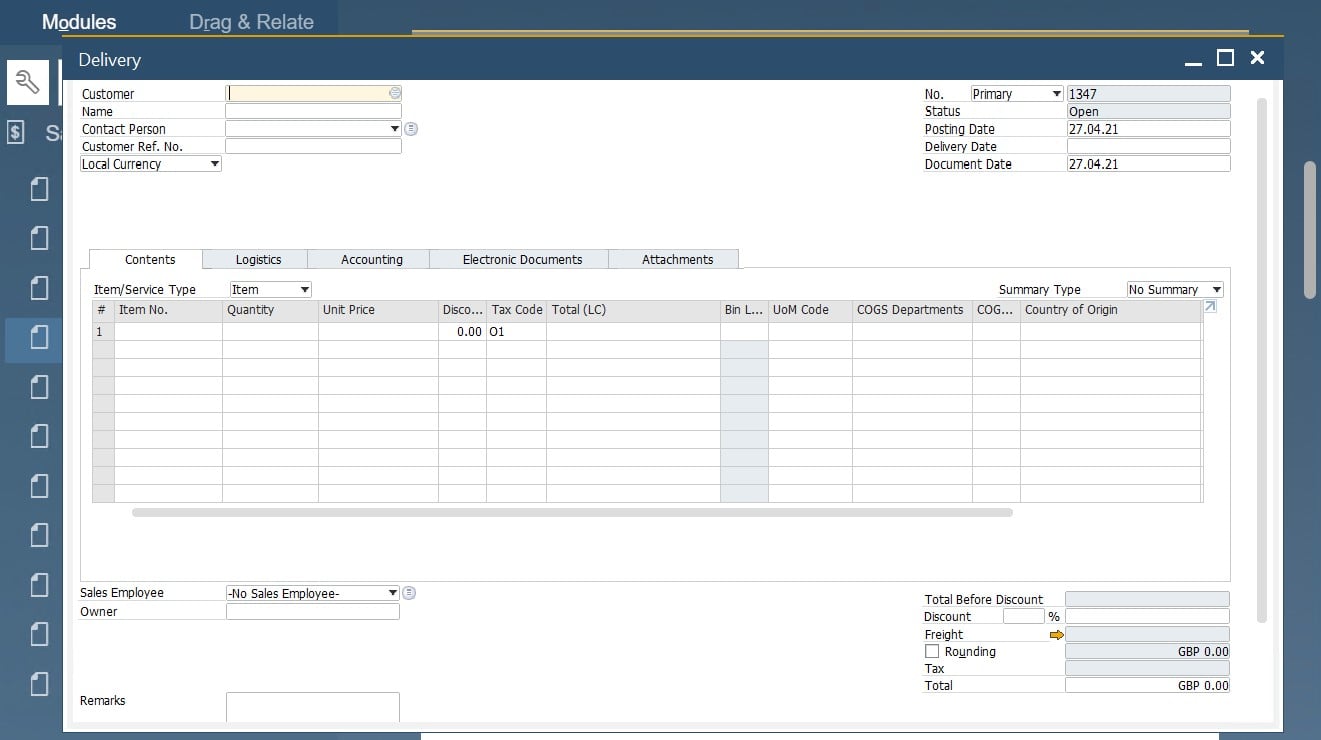
- Select a customer;
- Specify items for delivery.
- Click Add to post the delivery.
Alternatively, SAP Business One enables you to create a delivery from a sales order or sales quotation:
- Open the document to copy a new delivery from (sales order or quotation);
- In the Copy To button’s drop-down list, select Delivery.
At the same time, it is possible to create a delivery from multiple orders or quotations. We describe this process in another chapter.
Now, let’s say a few more words about the pick and pack process in SAP Business One. When a new sales order gets an approved status, the system empowers you to use the pick and pack manager. The latter is available in the inventory module. It delivers a more user-friendly way of handling your picking activities:
- You create a pick list;
- Report picked quantities;
- Deal with packaging;
- Perform other delivery preparations.
The SAP Business One pick and pack manager lets you add some or all items to the list. You can also generate a new delivery at any stage of the picking process. We share more nuances of this process in another article. Now, let’s return to the main topic of this chapter.
SAP Business One lets you cancel a delivery document in two ways. Firstly, you choose the Data/Cancel option. Secondly, it is possible to select the same action in the context menu. In both cases, the ERP system generates a new cancellation delivery document. It means that both the inventory and the accounting transactions are reversed.
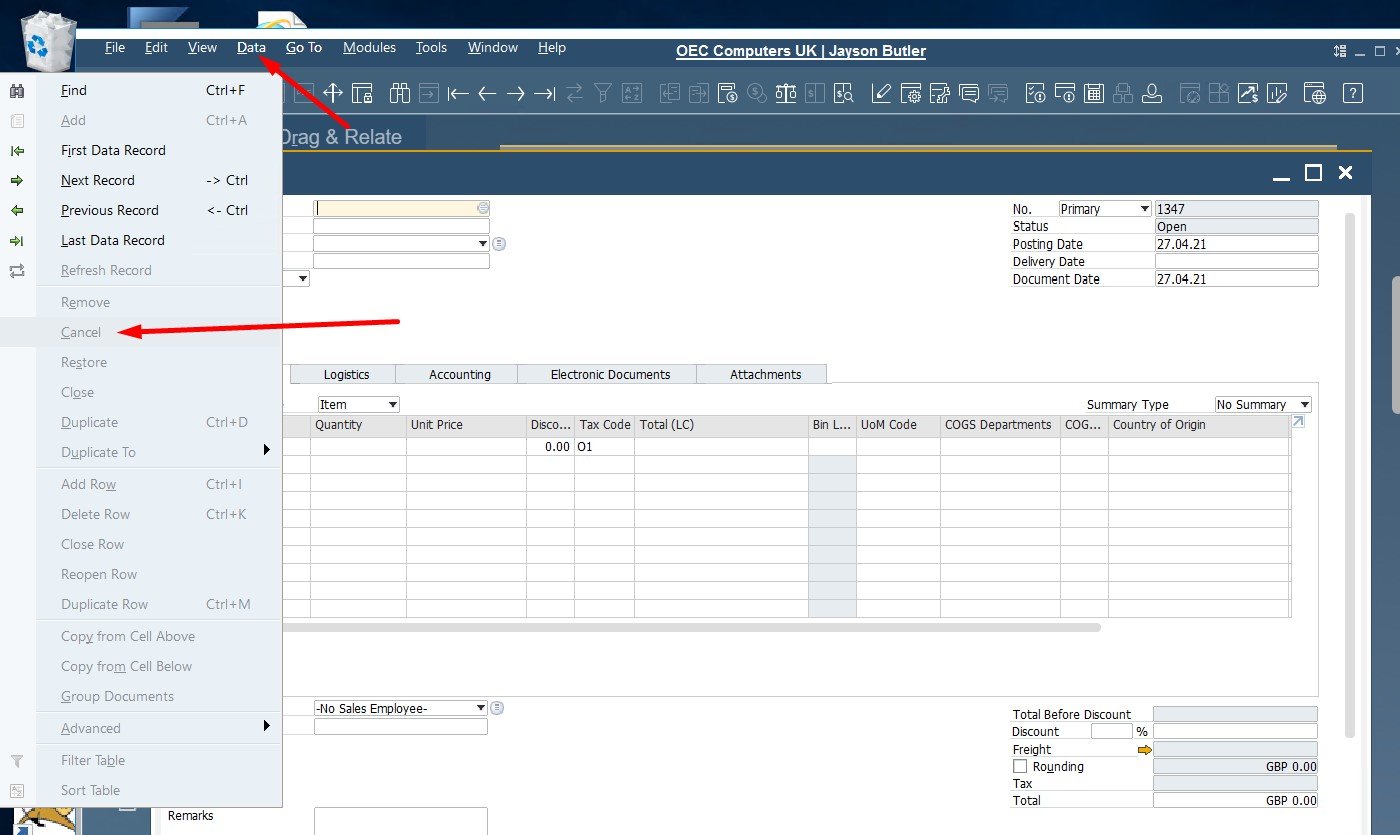
You can also use this option to correct mistakes associated with the delivery document creation. The most common problem is caused by the manual data entry: you specify the wrong customer or item.
Also, note that if items were delivered but then sent back, you can create a return document based on the delivery, reversing all the transactions. However, it is impossible to create an A/R invoice based on a delivery that has been closed or canceled. SAP Business One also doesn’t let you create several sales documents with the reference to the same delivery. Changes to the closed delivery are prohibited as well.
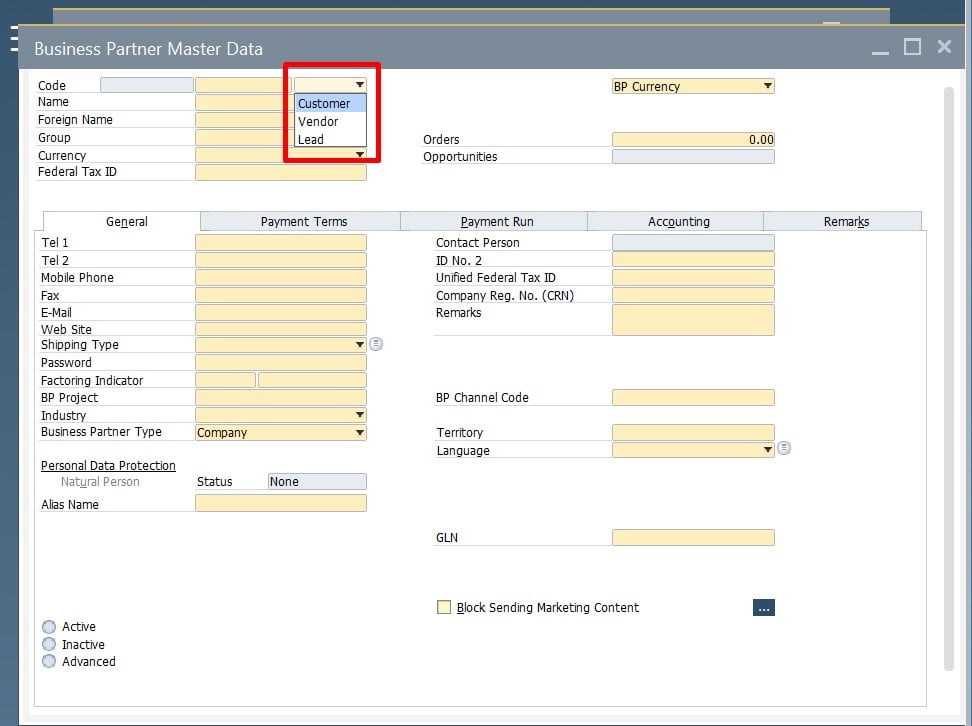
Another limitation is associated with leads. If your business partner is still classified as a lead, SAP Business One doesn’t let you copy data from a sales order to create a delivery document. Therefore, it is necessary to turn your lead to a customer.
In SAP Business One, changing a lead to a customer takes place in the business partner master data as follows:
- Proceed to the business partner master record;
- Select Customer instead of Lead from the drop-down list to the right of the business partner code.
Another important aspect of the delivery management in SAP Business One is that you can identify the packaging structure right in a delivery document. This feature dramatically optimizes the way you pack and ship a large number of items:
- Choose the Packing Slip option from the context menu;
- Allocate items and quantities to package types;
- For items with serial or batch numbers do the following:
- Right-click the quantity field;
- Choose the Batch/Serial Numbers option;
- Identify batch and serials released from stock.
How does a delivery impact accounting and inventory
When you create a delivery, the following things happen:
- SAP Business One reduces the inventory levels.
- Posting a delivery leads to the posting of the corresponding goods issue.
- When the goods are taken from the warehouse, the system records the relevant inventory changes.
- The inventory account is then credited.
- The cost of goods sold account is debited.
If you use perpetual inventory, provide all items with the cost information before selling them. Otherwise, you will face issues upon the delivery of the items. The G/L won’t reflect the change in the inventory value.
To address this issue, deselect the Allow Stock Release Without Item Cost checkbox situated under Administration/System Initialization/Company Details/Basic Initialization.
How to manage returns in SAP Business One
If your customer returns goods, you need to create a return document. For the invoiced returned goods, create an A/R credit memo. Remember that entering a return document leads to the partial or full reverse of the delivery posting. As a result, posting a return document updates the inventory quantities and value using the original item cost from the corresponding delivery document.
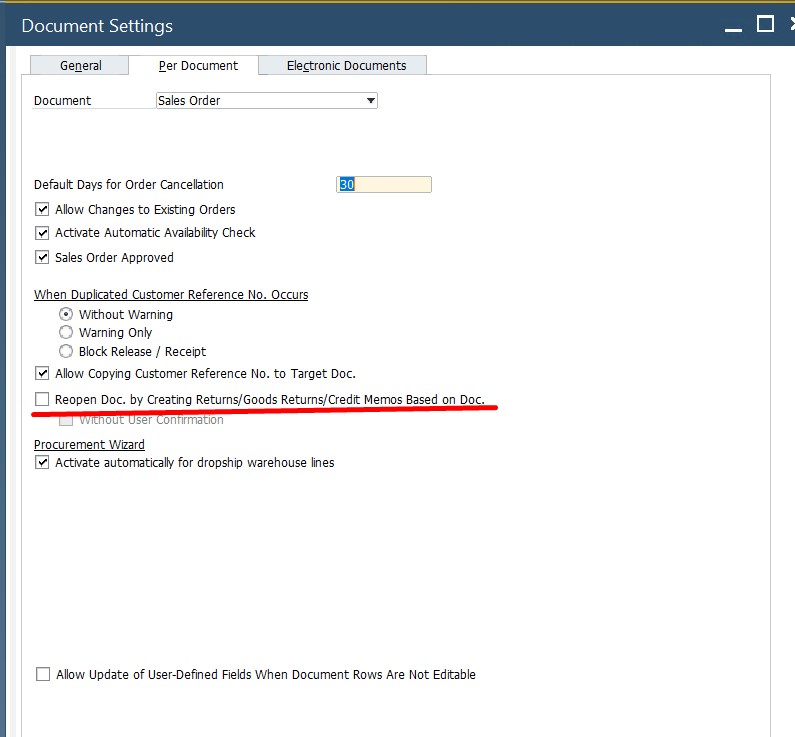
For the delivery based on a sales order, you can reopen it once the return is posted. However, this option should be enabled under Administration/System Initialization/Document Settings/Per Document tab.
Step 4: SAP Business One A/R Invoice
After delivering goods or providing services, you need to bill the customer. SAP Business One lets you use an A/R invoice for that purpose. Thus, any document of this type is considered a request for payment. As a result, posting an A/R invoice applies changes to the profit and loss statement, recording the revenue.
How to create and post an A/R invoice in SAP Business One
SAP Business One lets you create an A/R invoice based on several document types. You can use either single or multiple sales quotations, sales orders, or deliveries.
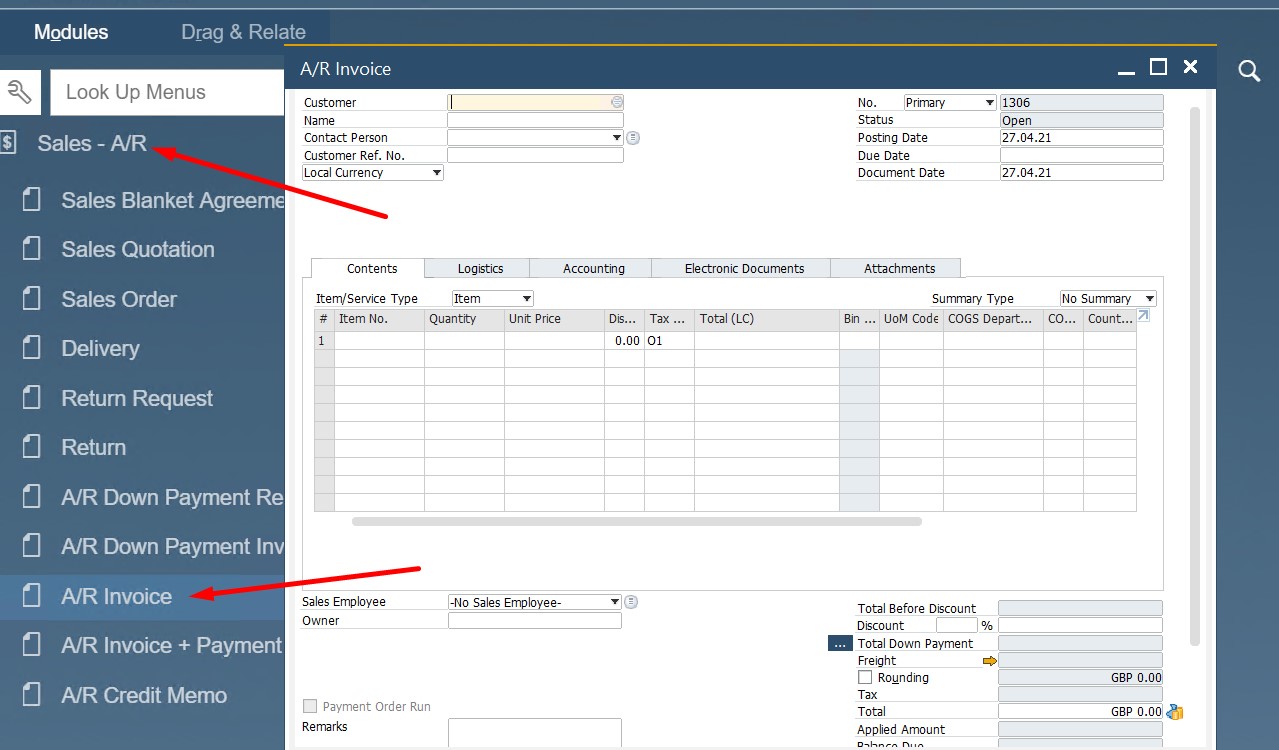
At the same time, it is possible to create an invoice from scratch. Do the following:
- Go to Sales – A/R;
- Choose A/R Invoice.
Note that posing an A/R invoice has an irreversible effect: it cannot be changed or deleted. It happens because an SAP Business One A/R invoice is a legal accounting document that creates new G/L entries.
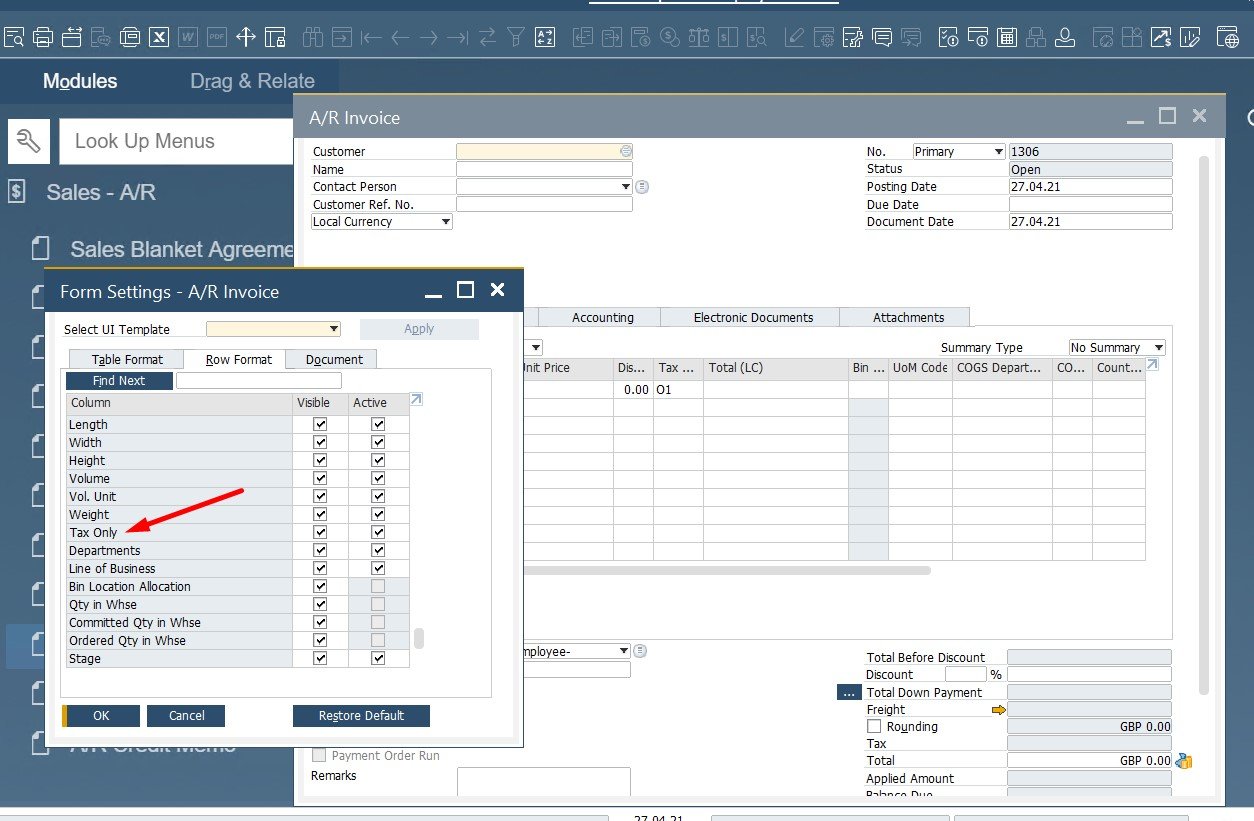
In addition to ordinary documents, the system also lets you post a Tax Only invoice. Documents of this type are utilized when it is necessary to provide a gift or a trial but charge sales tax. The system calculates the tax amount using the unit price. As for the journal entry, it reflects just the tax posting.
You can create a Tax Only invoice in SAP Business One as follows:
- Click the Form Settings icon;
- Add the Tax Only column to the invoice table.
- Configure invoice as tax only.
How does an A/R Invoice impact accounting and inventory
The A/R invoice posting leads to the posting of a journal entry to the corresponding customer and revenue accounts. If there is no reference to a delivery, the system also decreases inventory values and quantities, following the information specified in the A/R invoice. After that, SAP credits the inventory account and debits the cost of goods sold account following the current item cost. Besides, posting to customer and revenue accounts occurs.
It is also worth mentioning that you can add negative rows to an invoice to record credits or returns from the customer. Thus, you eliminate the necessity to create an additional document. And the invoice total can be negative. The system notifies you about that but by confirming you add the negative invoice.
How to create an A/R Invoice Plus Payment in SAP Business One
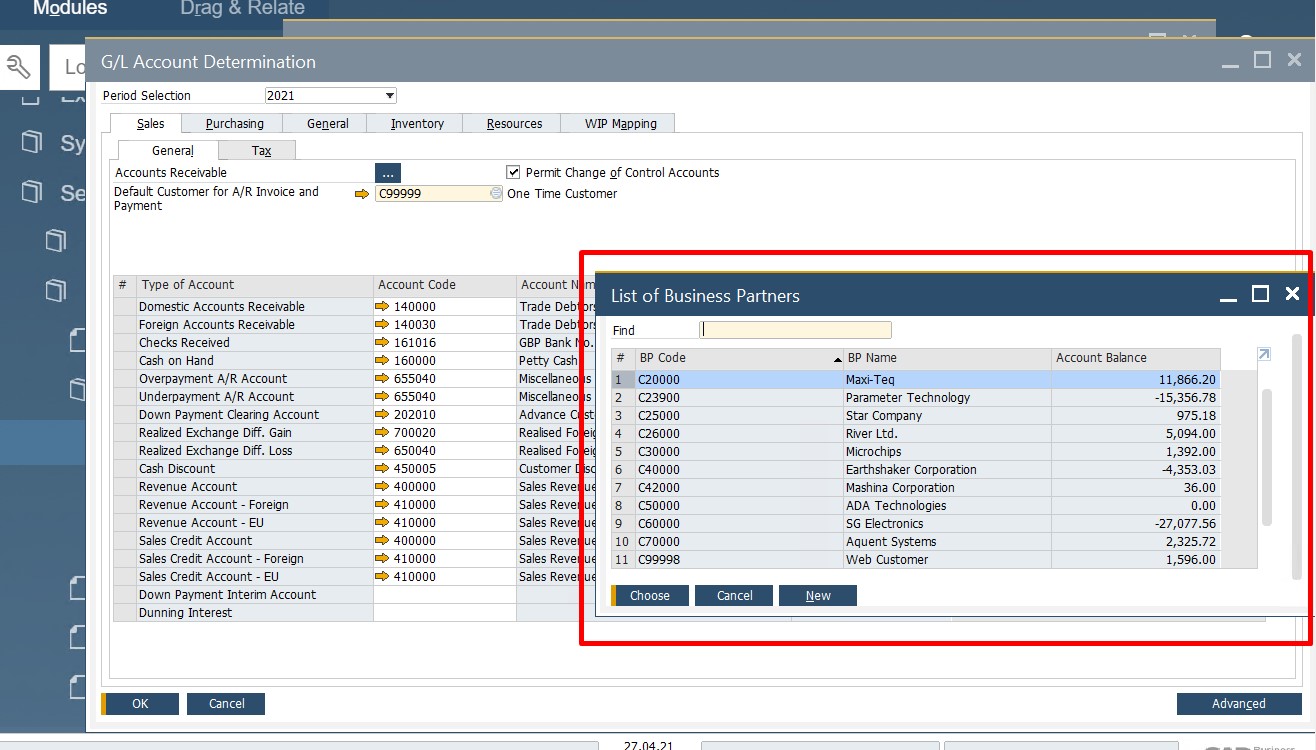
Let’s explore an optional sales A/R process document – A/R Invoice + Payment. We’ve already mentioned above that the system uses it to record cash sales to one-time customers. However, SAP Business One requires you to create a special master data record prior to using this feature. You can define this record right on the initial SAP Business One configuration while determining the primary G/L accounts.
However, if your system still lacks a default one-time customer, you’ve come to the right place. Below, we will describe how to create a master data record for a one-time buyer in SAP Business One:
- Proceed to Administration/Setup/Financials / G/L Account Determination.
- Open the Sales tab.
- Proceed to the General subtab and press Tab in the Default Customer for A/R Invoice + Payment field.
- A list of customers displays.
- Choose an existing customer or enter a new one.
- Now, create a one-time sale:
- Choose Sales A/R / A/R Invoice + Payment.
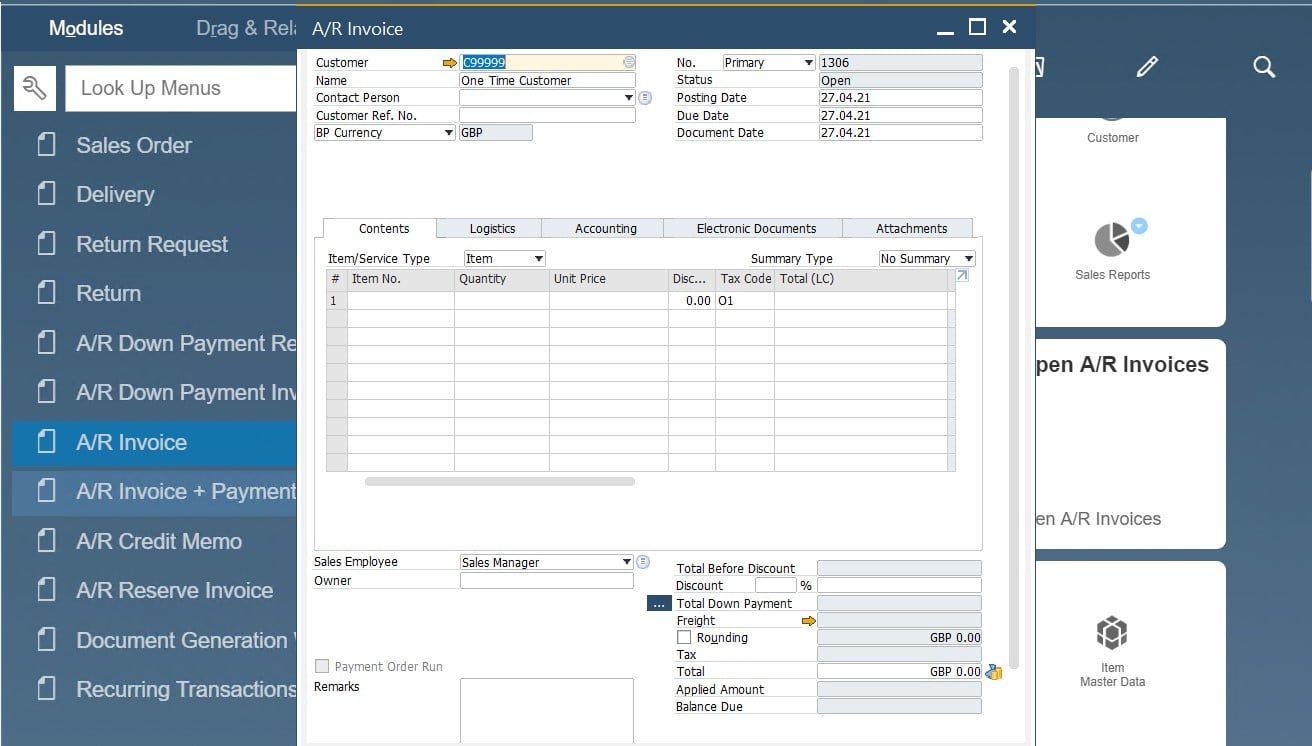
- Choose Sales A/R / A/R Invoice + Payment.
- Although SAP Business One specifies the one-time customer’s information automatically, you can add details if necessary. The system lets you apply the following changes:
- Add items;
- Change quantities;
- Specify a tax code;
- Apply discounts, etc.
- Hit the Payment Means icon to display the corresponding window.
- Specify a payment for the full invoice amount.
Note that partial payments are not accepted for one-time sales. - Click OK.
- Complete the sale by clicking the Add button.
In SAP Business One, the A/R invoice plus payment and a standard A/R invoice are quite the same from the perspective of what’s going next. The system processes the corresponding journal entries in the SAP Business One accounting and inventory modules.
How to create an A/R Credit Memo in SAP Business One
SAP Business One requires a return document if a customer returns goods. However, if it happens after you’ve posted the A/R invoice, it is necessary to issue an A/R credit memo. Let’s see how it works. You can create it from scratch under Sales – A/R -> A/R Credit Memo.
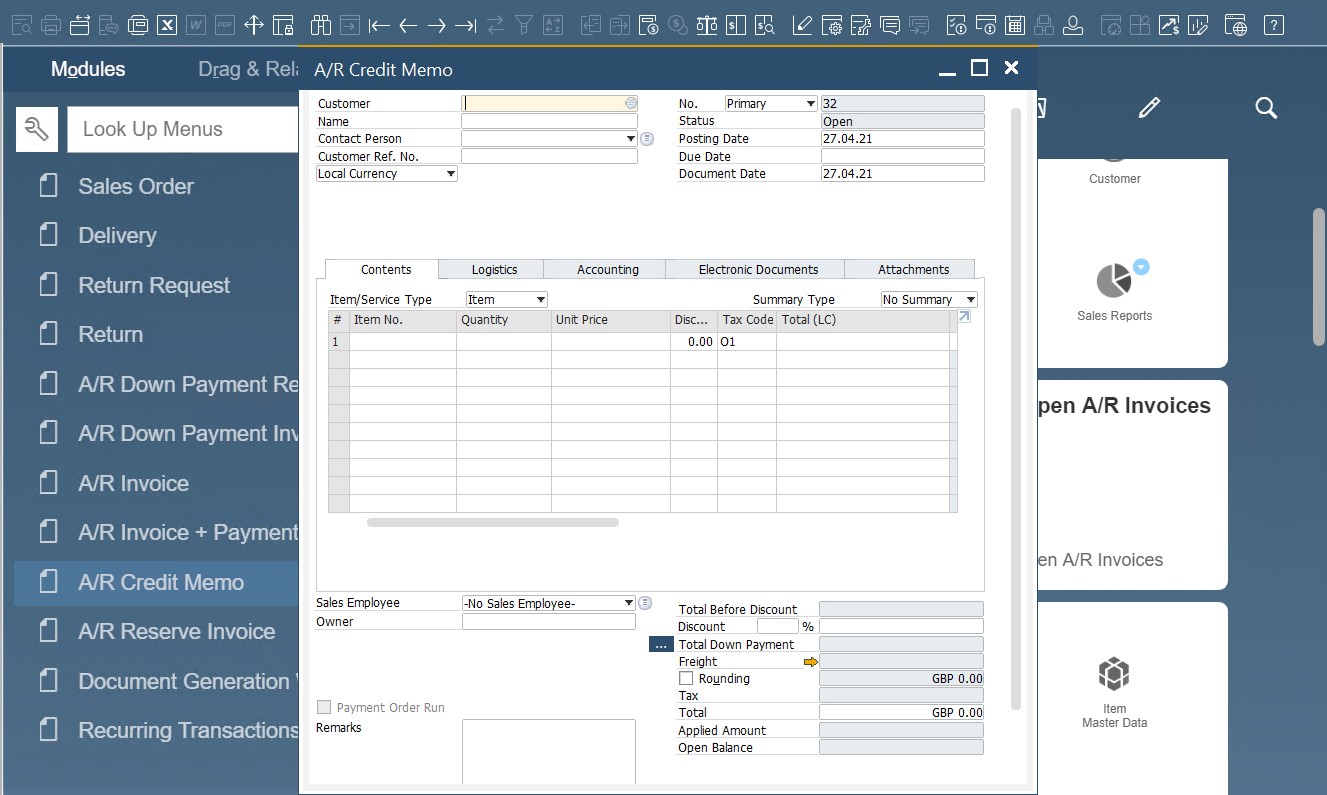
Creating an A/R credit memo reverses the posting of a corresponding A/R invoice either partially or fully. Thus, posting the A/R credit memo increases inventory quantities, credits the customer account, and amends the revenue account by the same amount. As for the sales tax, SAP Business One corrects it automatically.
SAP Business One lets you create A/R credit memos from existing A/R invoices and return documents. Note that the system has a restriction related to copying return documents to A/R credit memos. If the former is based on a delivery, you cannot copy it to an A/R credit memo. However, if your return document isn’t based on a delivery, you can create an A/R credit memo on top of it.
If a customer receives a credit or rebate and you want to invoice them for the purchased items, it is possible to have negative rows in a credit memo. The system bills these negative rows to a customer instead of crediting them.
Another opportunity that we should mention here is that SAP B1 enables you to create A/R credit memos for non-inventory items or services you provide. Such documents don’t affect inventory quantities.
Crediting a customer for overcharging for a certain item is also possible in SAP Business One. However, you don’t need to use a service A/R credit memo. Instead, follow these steps:
- Enter the items;
- Activate the Without Quantity Posting checkbox for the row. Thus, you will indicate that the credit is monetary without affecting the inventory.
- If the field is not displayed, activate it in the Form Settings.
How to create an A/R Reserve Invoice in SAP Business One
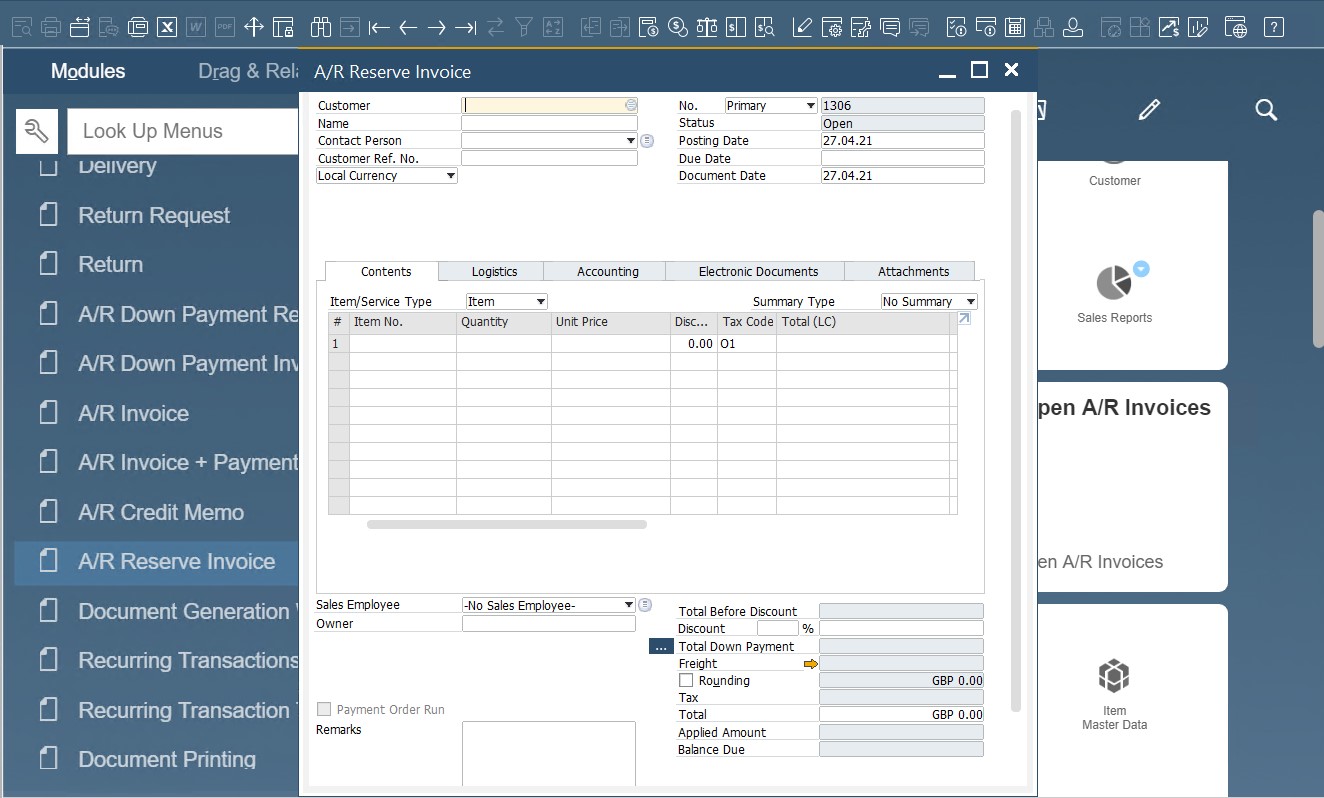
If you need to bill a customer before you ship their items, SAP Business One lets you use the reserve invoice. This document records revenues without affecting inventory. Therefore, you need to create a delivery and copy from the reserve invoice after shipping the items. The reserve invoice status, in its turn, changes to Delivered. As for the delivery, it is set to Closed. In a situation when you need to credit an undelivered reserve invoice, the inventory level is not affected by the credit memo.
You can create this document from scratch under Sales – A/R -> A/R Reserve Invoice:
How does an A/R Reserve Invoice impact accounting and inventory
Posting the reserve invoice creates a journal entry to the customer and revenue account. Although no inventory transactions occur, the committed quantity is increased. Therefore, you need to create a related delivery to clear the committed quantity and decrease the on-hand inventory level.
How to cancel an A/R Reserve Invoice in SAP Business One
The ERP system empowers you to cancel a delivered reserve invoice. Firstly, it is necessary to create an independent credit memo. Secondly, internal reconciliation is required. We describe this process here.
Note that crediting an undelivered A/R reserve invoice doesn’t affect the inventory level via the corresponding credit memo. In this case, the system reverses the journal entry resulting from saving the A/R reserve invoice.
SAP Business One A/R Down Payment Process
SAP Business One lets you get a part of the total due in advance and record this transaction within the system. Usually, it happens when you create a sales order. As a seller or service provider, you get a real commitment from your customer to buy goods and services. Also, note that this transaction is also called a Deposit on Order. You can record this payment as follows:
- Create a new sales order;
- Click the Payment Means icon;
- The Payment Means window displays.
- Once the sales order is added, the system creates the following three documents:
- The sales order;
- The related down payment invoice;
- An incoming payment (it closes the down payment invoice).
- Issue the final A/R invoice to complete the process.
You can create this document from scratch under Sales – A/R -> A/R Down Payment Invoice:
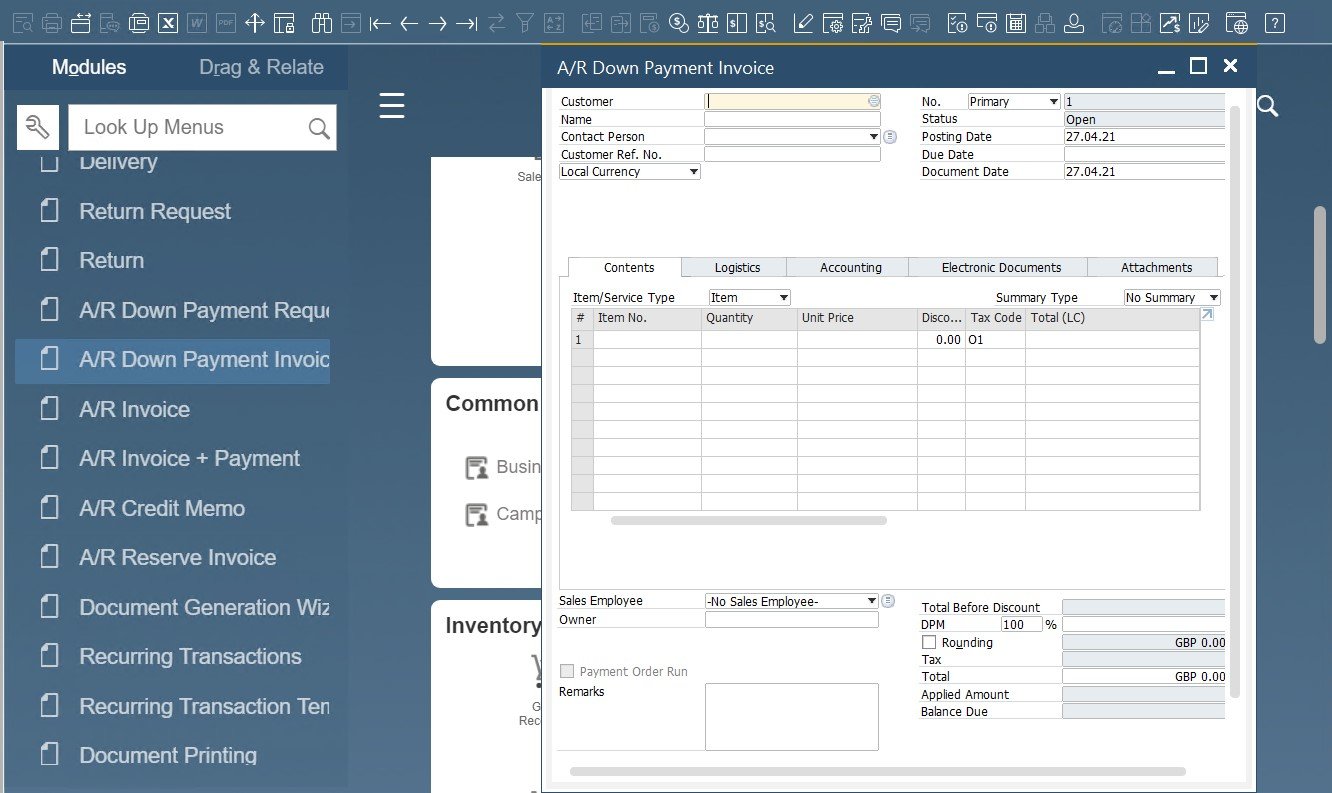
Note that in the case of a sales order-based invoice it is necessary to apply the down payment invoice to reduce the number of items. While applying a down payment, SAP Business One lets you choose to pay the full order amount, including tax and freight. At the same time, paying an amount above the original order amount is possible too. By applying the entire down payment amount, the invoice total becomes negative.
Alternatively, it is possible to create a down payment invoice from scratch. In this case, you generate the new document either with or without a reference to a sales order. For the second situation, create an incoming payment when the payment arrives and apply it to the down payment invoice.
How does an A/R Down Payment Invoice impact accounting and inventory
In SAP Business One, posting a down payment invoice doesn’t affect inventory. The system credits the document funds to a predefined liability account and debits a customer. You can apply the down payment to the A/R invoice only when it is paid. At this stage, SAP turns the amount from the liability to the revenue account. As for the customer, they are debited for the remaining balance.
You can specify the default down payment account as follows:
- Go to Administration/Setup/Financials / G/L Account Determination;
- Proceed to the Sales tab.
- Open the General subtab and press Tab in the Payment Advance. Now, you can select the liability account. Although it will appear on the business partner master data, you will be able to override it with a different account.
To apply a Down Payment to an A/R Invoice, perform these steps:
- Create the A/R invoice;
- Click the browse button at the bottom of the document. It is situated next to the Total Down Payment field.
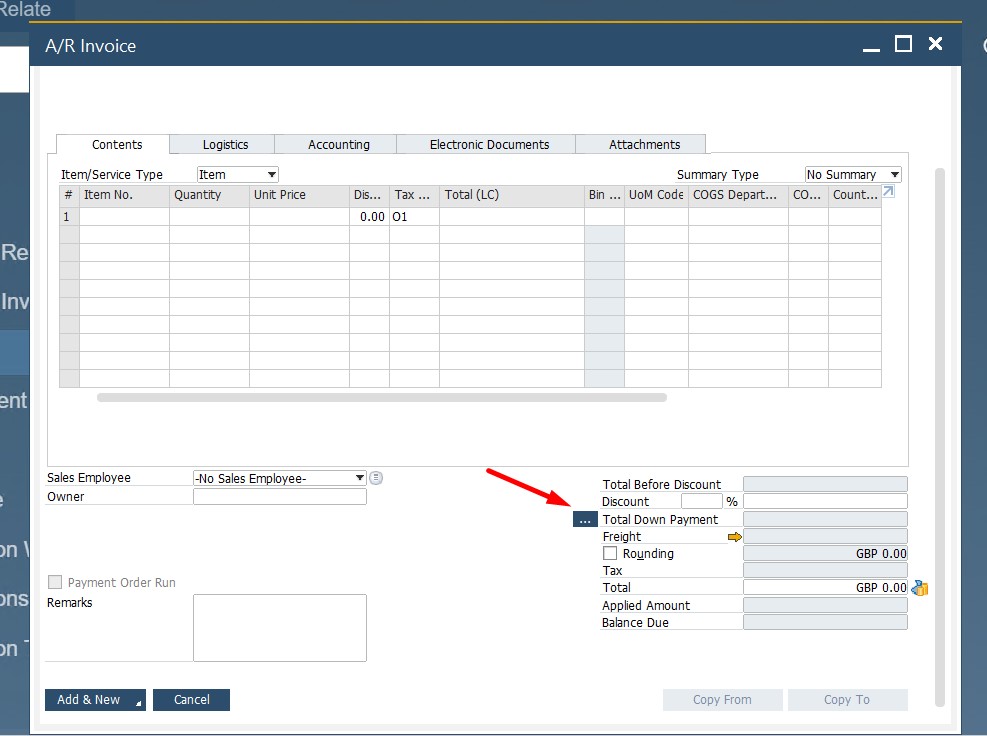
- Browse a list of paid down payment invoices for the selected customer.
- Draw the entire amount or edit the Amount to Draw field.
The system lets you apply multiple deposits to the same order. A list of all down payments is available at right-clicking the sales order screen and choosing Related Down Payment Transactions.
How to create a Blanket Agreement in SAP Business One
In SAP Business One, a customer can commit to purchasing certain items or services from you over a period of time with the help of a blanket agreement. On the other hand, you commit to delivering them at a special price within a discussed timeframe. The ERP system, in its turn, can track the fulfillment level of the agreement. You only need to create a new Blanket Agreement document to record the terms. Items covered by the blanket agreement have a sales order linked to the blanket agreement. As a result, you can always check the agreement’s status.
You can create this document from scratch under Sales – A/R -> Sales Blanket Agreement:
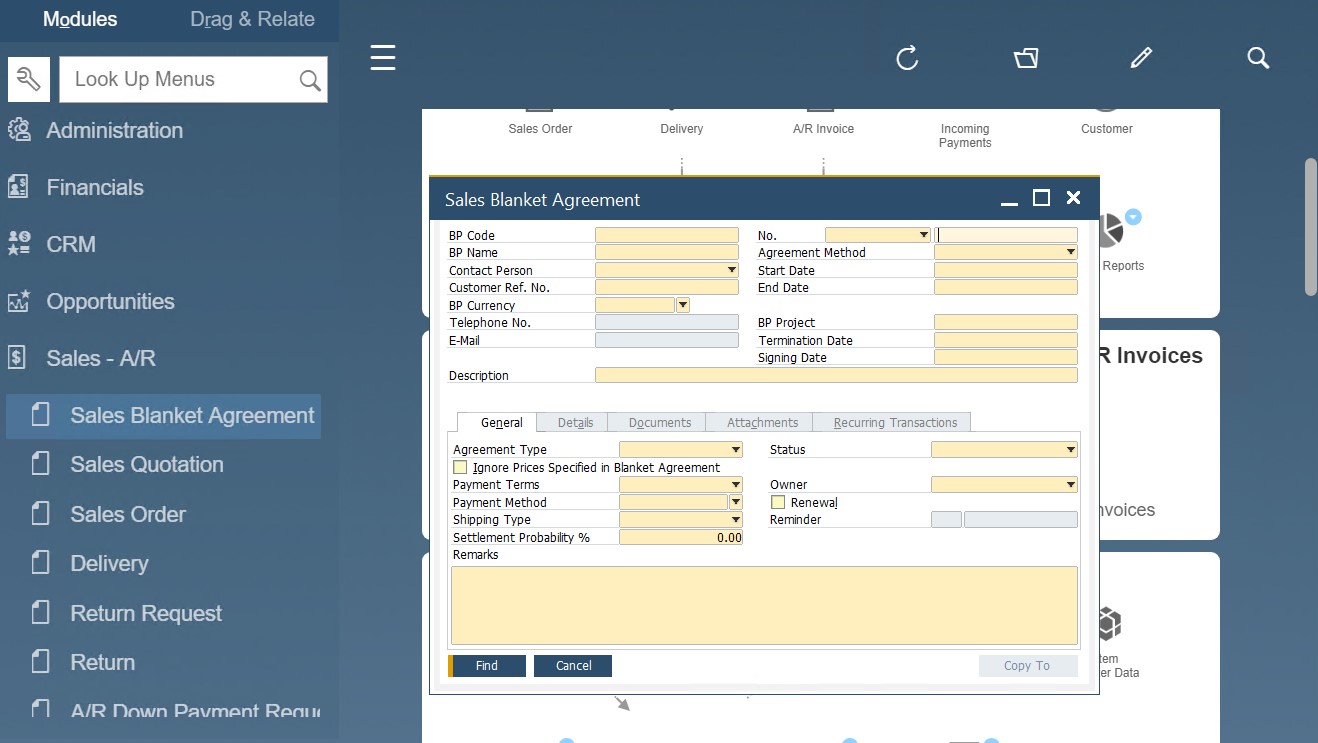
As for the information, stored in a blanket agreement, it is first of all the customer name and period. The document can be based on a monetary value or items. Other data is divided between the following tabs:
- General. Here, you choose whether it is a Specific (its prices are used in the sales documents) or a General agreement.
- Details. On this tab, you specify items, quantities, and prices if the Item method is used. Set the total amount and discounts for the monetary method. Despite the chosen approach, you have to identify the frequency and schedule of the sales amount or delivered quantities. Double click the row to do that.
- Documents. Here, you can see all sales documents posted for the customer applies to the blanket agreement.
- Recurring transactions. Here, SAP Business One empowers you to link recurring documents to the blanket agreement. Thus, you can reflect the sales throughout the period.
Note that blanket agreements are also suitable for purchasing. As a result, you can commit your company to purchase from your business partners following predefined terms. However, it is not a legally binding document. Thus, it impacts neither accounting nor inventory.
How to Build One Document from Another in SAP Business One
As we’ve already mentioned several times, SAP Business One enables you to build sales documents from each other: a quotation can be easily turned into a sales order that can be used as a foundation of a delivery that forms an A/R invoice. You can quickly copy a document to the next one in the sequence with the help of the Copy To button.
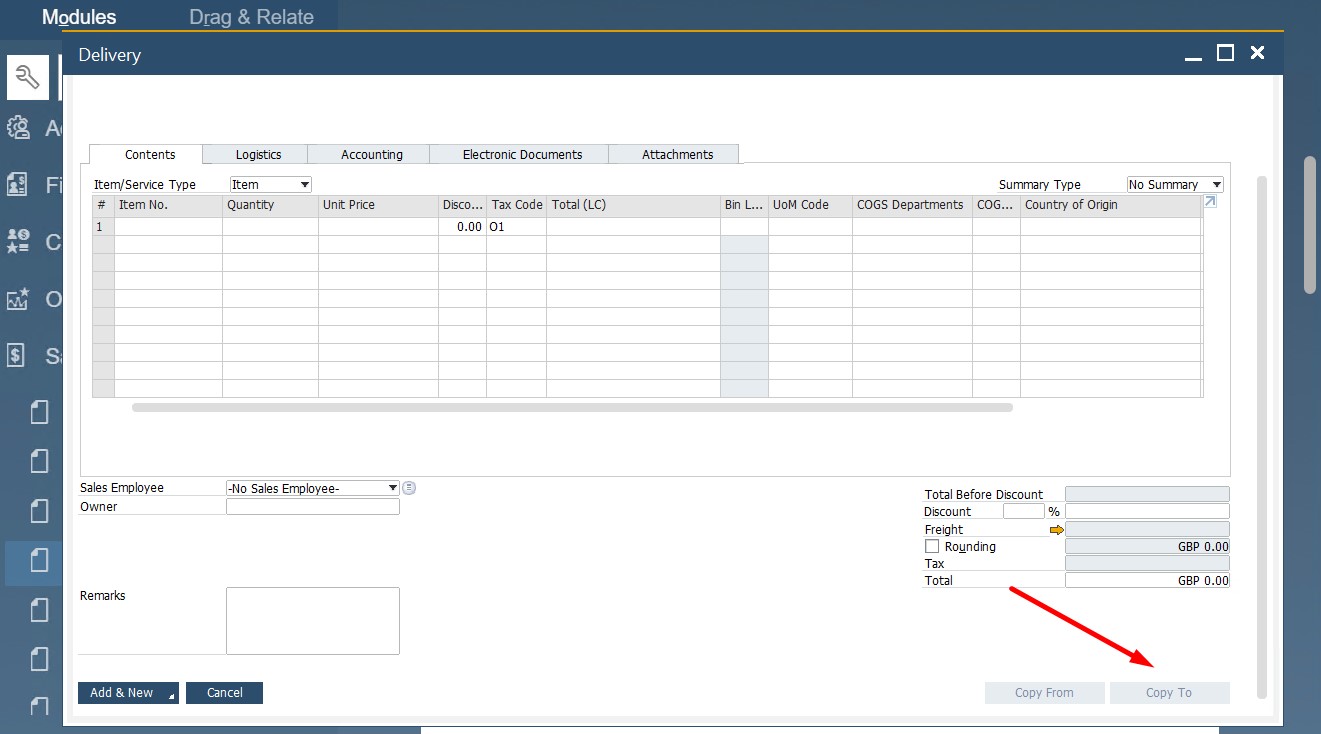
When you apply this approach, there is always a base document, an original document you copy data from, and the document you create or a target document. Switching between them not only saves time and effort but also lets you avoid errors associated with manual data entry.
However, SAP Business One has several limitations in this area. We’ve already discussed above that it is impossible to move from one document to another if specific conditions are met. At the same time, you cannot mix items and services. Therefore, the base document and the target document should be of the same type.
Another important aspect is that SAP empowers you to follow the trail of documents in a sequence. You can do that as follows:
- Display a sales order created from a sales quotation;
- Click the Base Document icon;
- See the original sales quotation the document is based on;
- Apply these actions to documents of any type.
Use the Copy From button to select a base document from which you want to generate a new document. It launches the Draw Document wizard. You can view the entire document flow on the Relationship Map. It lets you drill down to every document, item, or business partner in a sequence. Besides, you can see the journal entry of a document posted. To open the Relationship Map, do the following:
- Open a document;
- Open a context menu;
- Launch the Relationship Map;
- Click on any object to drill-down; right-click on the documents to view posting details, related items, and pick lists.
How to Process Groups of Documents in SAP Business One
If your business requires creating many sales documents at once, you’ve come to the right place. SAP Business One allows for creating A/R invoices or deliveries in batches with the help of the Document Generation Wizard.
At the same time, the Dunning wizard is at your service when you have customers who are late with payments. The tool will help you generate numerous late notices simultaneously.
The SAP B1 Document Generation Wizard
The Document Generation wizard allows you not only to do an invoice run but also to combine open sales orders or deliveries in one invoice. As a result, your customers get a unified way to pay all they owe you.
You can run the SAP Business One Document Generation Wizard as follows:
- Go to Sales – A/R;
- Choose Document Generation Wizard.
- The tool lets you select the base and target document type (e.g., a delivery as a base and an invoice as a target).
- After that, identify whether one or multiple base documents create a target;
- Specify behavior for missing data.
- Launch the run.
- You will receive a summary of all the newly created documents at the end.
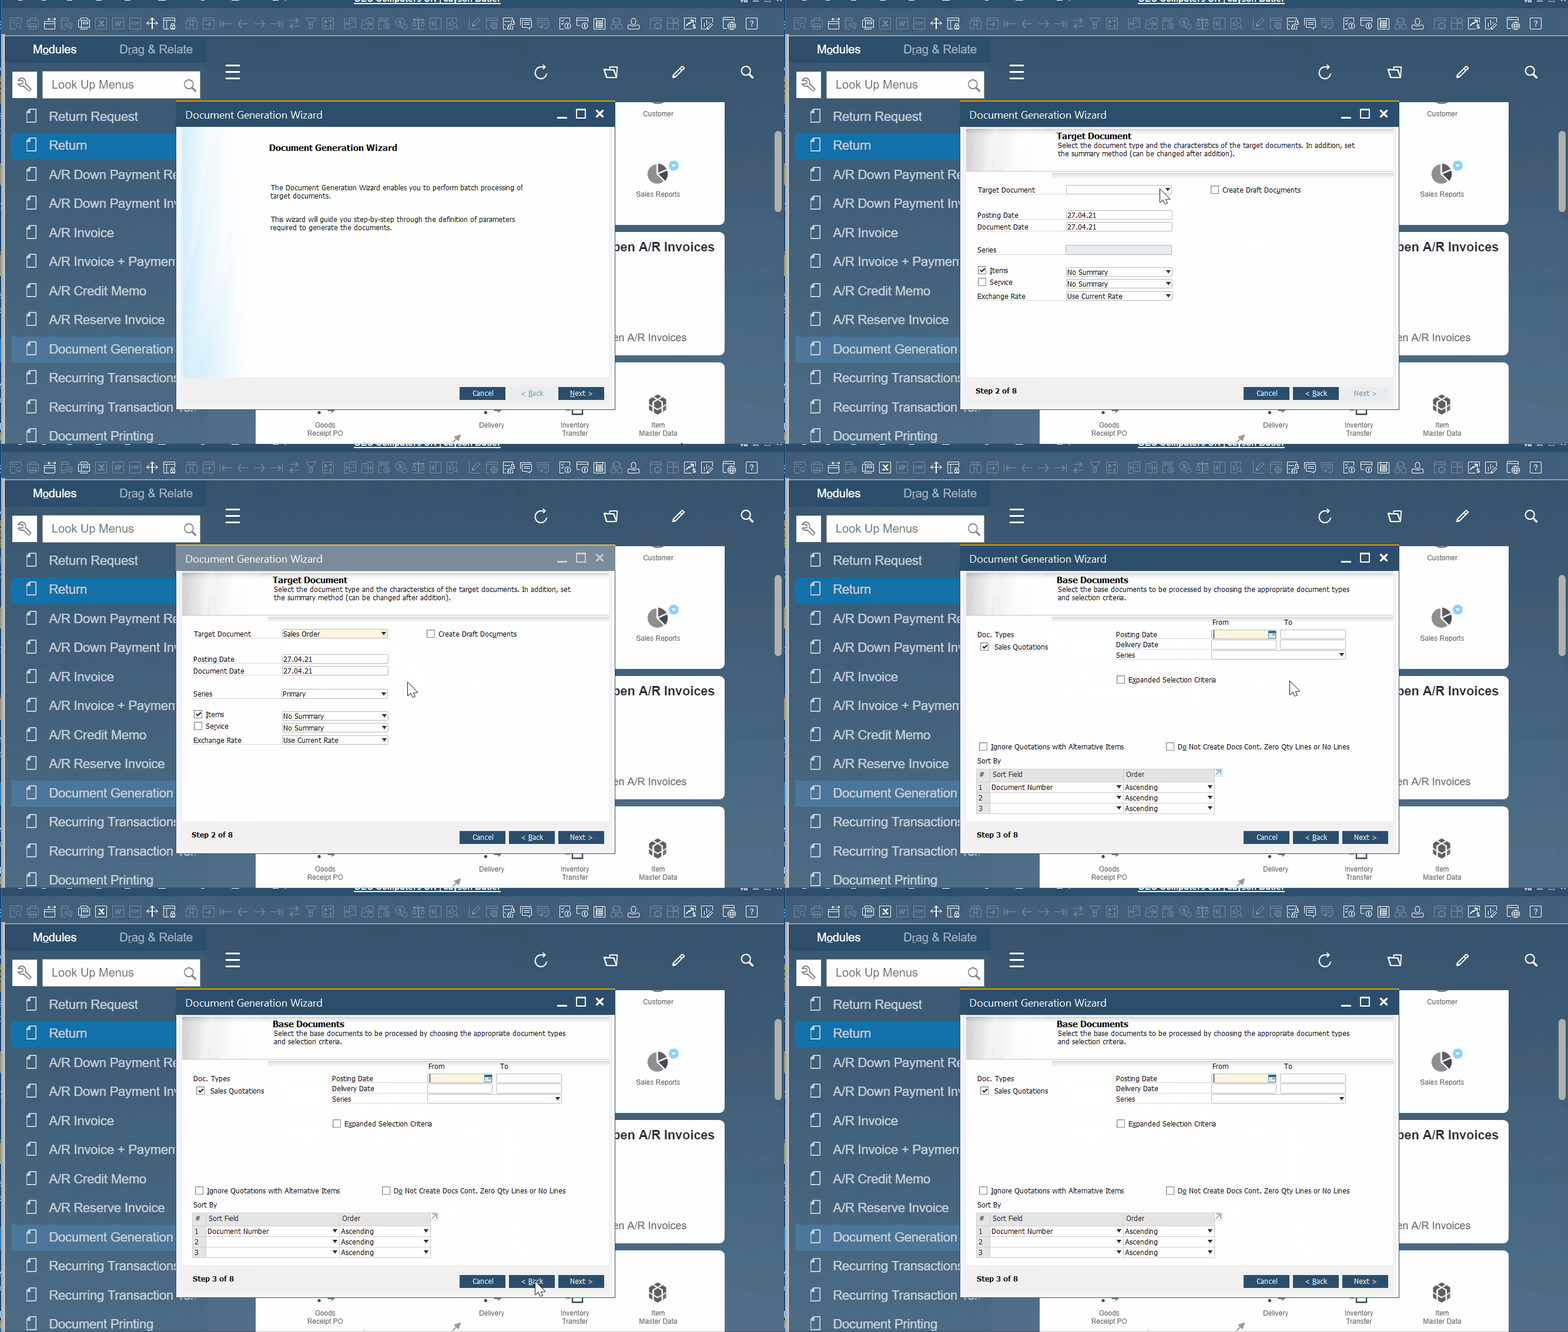
Note that when you create sales documents with the help of the Document Generation Wizard, SAP Business One also adds the corresponding entries to the general ledger. Therefore, always pay attention to what steps you take within the tool.
The SAP B1 Dunning Wizard
With the help of the Dunning Wizard, you can send late notices to customers automatically. Besides, the tool monitors the customer payment behavior. Thus, you get the insights necessary to make decisions on payment terms for future orders. Besides, the wizard enables automated posting of dunning fees and interests.
You can run the wizard as follows:
- Selecting Sales – A/R;
- Launch the Dunning Wizard;
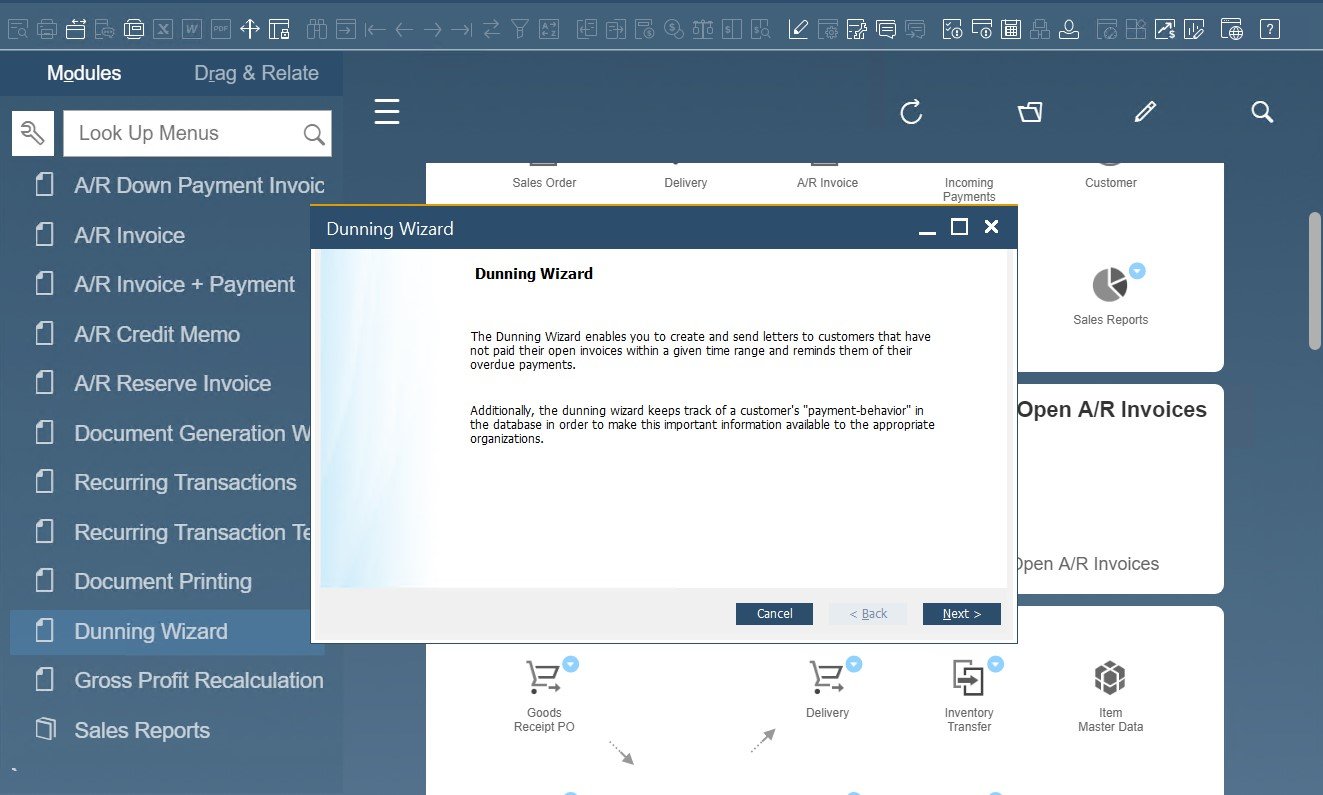
- Choose whether to load a saved wizard or start a new one.
- For the new run, specify general parameters:
- The dunning run name;
- Its date;
- Business partners.
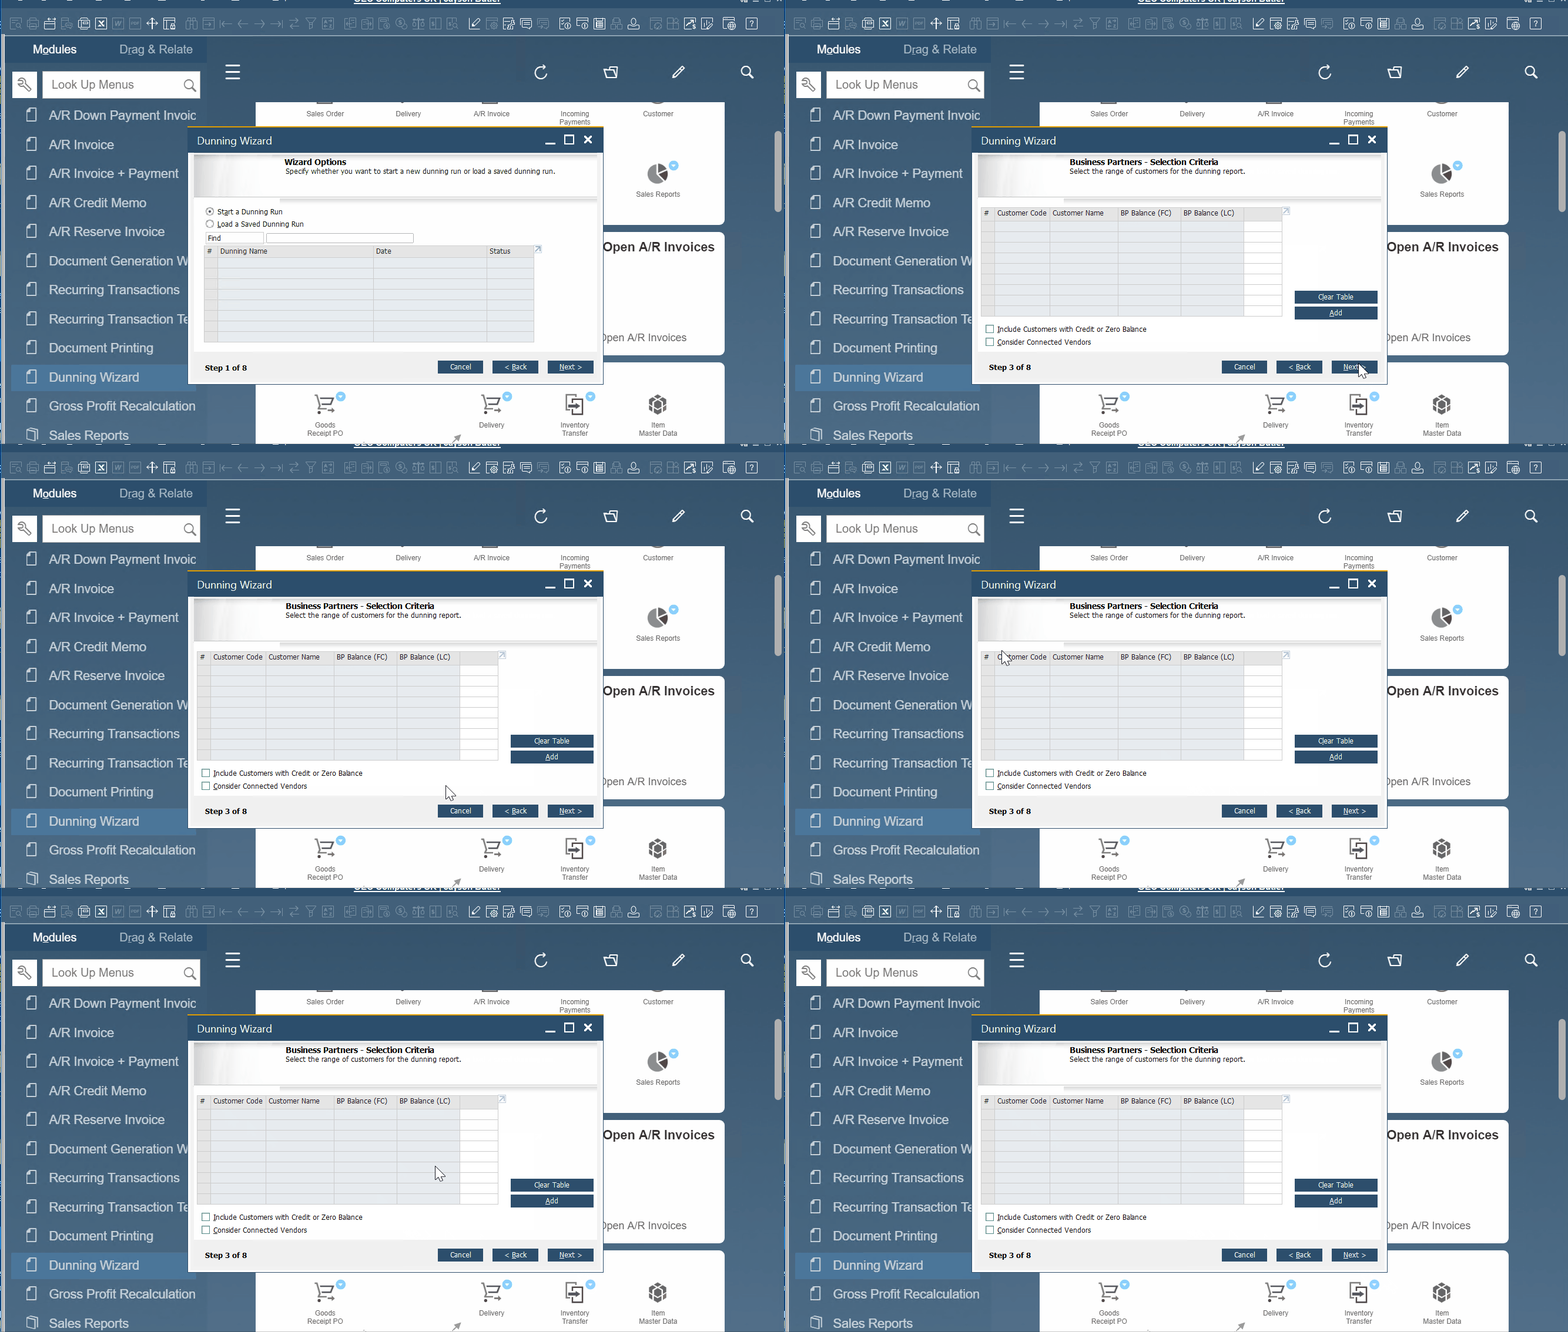
Note that the Dunning Wizard lets you provide a posting date range. In the default configuration, all dates are included.
The window lists overdue A/R invoices. Next, you can generate dunning letters for them. The tool lets you include manual journal entries as well as credits and payments that don’t incorporate invoices in the run.
To simplify the view, SAP Business One lets you collapse the list to business partners. Click the Collapse All button to achieve this goal.
When finished, you can select one of the following three options:
- Save the parameter set and exit;
- Save the recommendation report as a draft and exit;
- Print dunning letters and exit.
The SAP Business One Dunning Wizard requires several additional steps to be performed. For instance, it is necessary to set up the dunning levels and terms. You can do that under Administration/Setup/Business Partners.
Also, note that it is vital to assign each customer to a dunning term. Set up a default dunning term for new customers under Administration/System Initialization/General Settings/BP tab.
Recurring Transactions
SAPBusiness One recurring transactions are similar to recurring journal entries. You can use them for sales, purchasing, and inventory documents. If you provide services on a weekly basis, you can leverage recurring transactions, billing your customers automatically. SAP Business One will prompt when to post the invoice.
You can set up SAP Business One recurring transactions as follows:
- Go to the main menu and open the Recurring Transaction Template window under Sales -A/R;
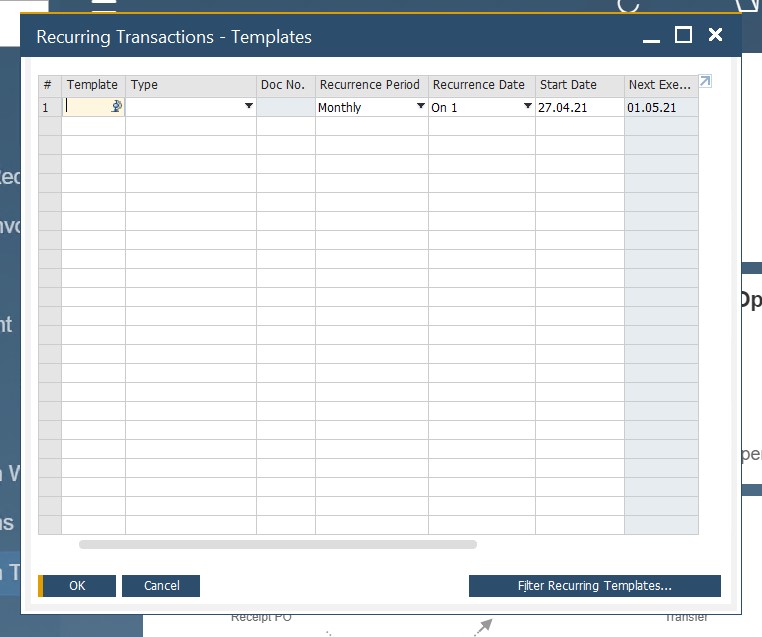
- Create a document template;
- Specify its type – the system creates a draft document.
- Set the frequency of transactions. In this pos
